
Introduction #
This guide provides step-by-step instructions for setting up and managing Virtual Sort Groups within TalentTelligent’s Digital Talent Tools platform. It outlines how Qualified Administrators (QAs) create new Sort Groups, add participants (Sorters), manage demographic data, and review results through the Virtual Sort Dashboard.
A Virtual Sort allows participants to sort Roles and Practices digitally using defined demographic and organizational parameters. The setup process determines the structure and output of reports, so careful selection of each variable is essential.
Administrator Responsibilities #
As the Qualified Administrator, you are responsible for selecting:
- The demographic variables to collect from Sorters
- The KSA library to be used for the Sort
- The Sort Question that defines the activity
- The participants (referred to here as Sorters)
Carefully choose the variables and configuration options before launching the Sort. The end reports and profiles are determined by the settings you establish during setup.
The launch process is entirely under your control. You can edit the Sort parameters and Sorters at any time before launch. Once the Sort is launched, the configuration becomes locked, and Sorters are automatically notified to participate.
Step 1: Create the Sort Group #
Menu Path: Digital Talent Tools → Virtual Card Sort Groups
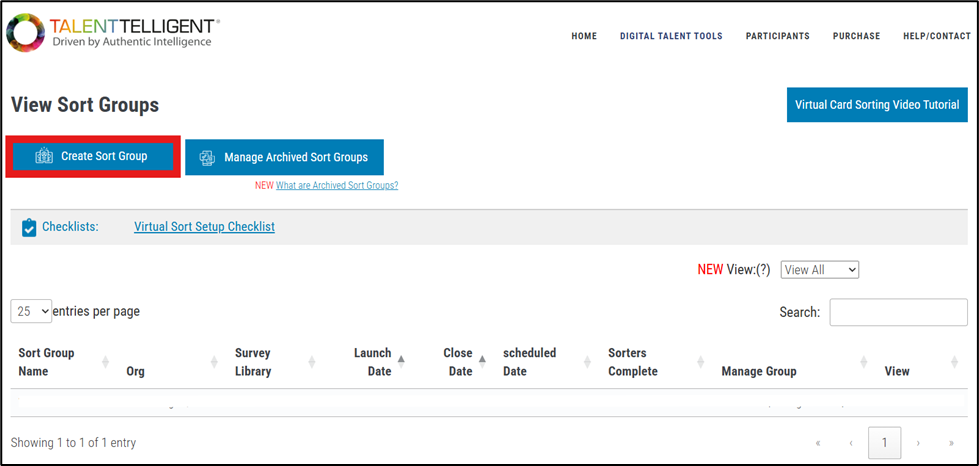
From the main Virtual Sort Groups page, click Create Sort Group. The setup process begins with entering your organization and Sort details.
Available Actions #
From the Virtual Sort Groups page, you can:
- Create Sort Group – Start a new Virtual Card Sort group.
- Manage Archived Sort Groups – Hide older closed groups from the main view without deleting any associated data.
- Virtual Card Sorting Video Tutorial – Watch a short walkthrough of this page and setup process.
- Virtual Sort Setup Checklist – Open the checklist for setup guidance.
Add New Sort Group: Name and Organization #
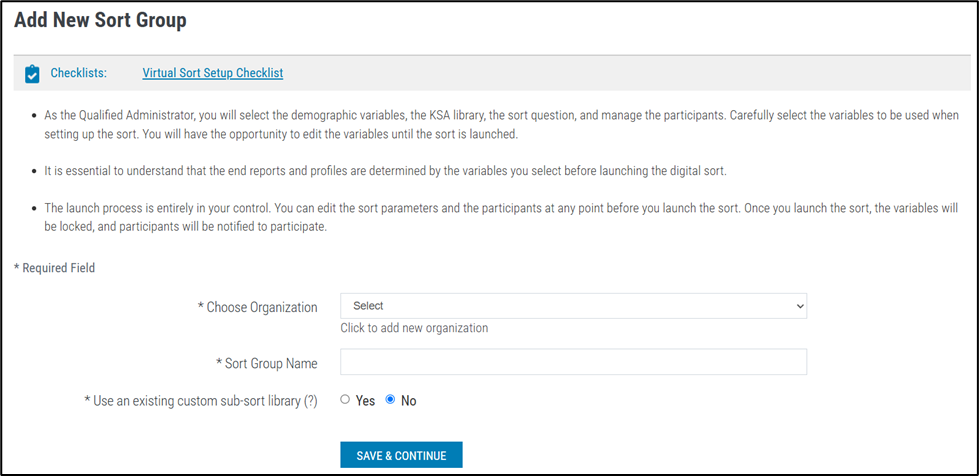
After clicking Create Sort Group, you’ll land on the Add New Sort Group page. Complete the required fields:
- Choose Organization – Select an existing organization from your QA account or click Add New Organization to create one.
- Sort Group Name – Enter a descriptive name that will help identify this Sort Group.
- Use an Existing Custom Sub-Sort Library – Typically set to No. Choose Yes only if you wish to duplicate an existing completed Sort Group and reuse its parameters and subset of Practices. Once selected, this option cannot be undone.
- If you only want to copy Sorters from a previous Group rather than reuse setup parameters, choose No here—you’ll have the opportunity to copy Sorters later.
How to Add a New Custom Sub-Sort Library #
Menu Path: Digital Talent Tools → Virtual Card Sort Groups
From the View Sort Groups grid, select the sort group with the practices you would like to use for the custom sub-sort library by selecting the View Virtual Sort button on the far right.
Then, select the Practices Detail tab. Select the Full View sub-tab. Use the checkboxes on the left to select which Practices you would like to be included in the custom sub-sort library. Click the Save Selected Practices button to save the custom sub-sort library. Now the sub-sort will be stored in the dropdown menu that appears when the Use an existing custom sub-sort library radio button is selected as Yes.
Add New Sort Group: Sort Details #

After completing the Name and Organization section, this next form will appear. Complete the required fields to define the Sort Group setup:
- Sort Question Category – Select the question category, or choose Custom Question to create your own.
- Which Library – Select the appropriate KSA Library available to your access level (e.g., Leaders, Managers, Individual Contributors).
- Number of Sort Columns – Choose between three or five columns.
- Sorting Type – Choose Relative or Absolute (Click “Relative/Absolute” to view descriptions).
Once all selections are made, click Save & Continue to proceed to the Demographics page.
Step 2: Define Demographics #
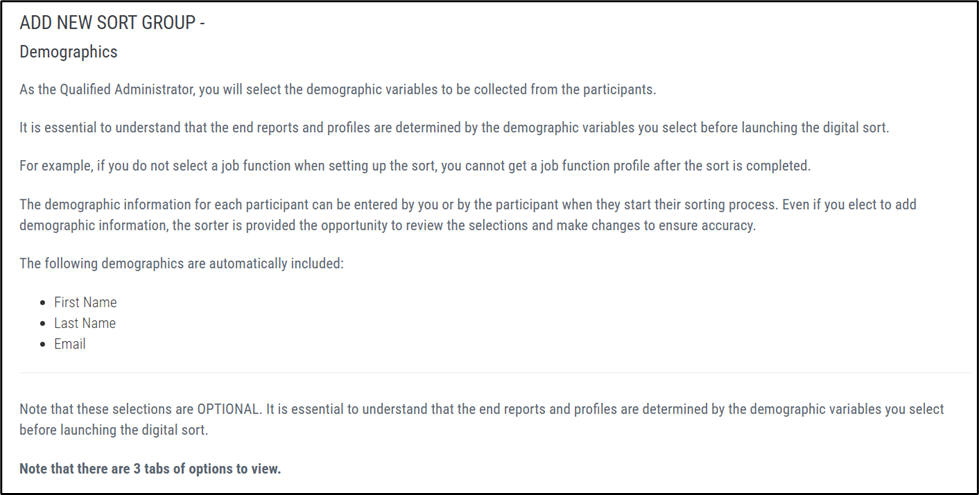
As the Qualified Administrator, you will select the demographic variables to be collected from the Sorters.
It’s important to note that reports and profiles are determined by the demographic variables you select before launching the digital Sort.
For example: If you do not select a Job Function when setting up the Sort, you won’t be able to generate a Job Function Profile once it’s complete.
Demographic information can be entered by you or by each Sorter when they begin their Virtual Sorting process. If you choose not to enter this information, the Sorter will be required to complete it before starting.
Demographics Tabs #
There are three tabs for defining demographic information:
- Employee-Specific – Collects personal and employment-related data such as Gender, Age, Tenure, and Education.
- Job-Related – Includes organization-based variables such as Organizational Level, Function, Department, and Job Title.
- Geographic – Captures location data such as Country, State/Territory, City, or Organizational Location.
All options default to No (N). To include a variable in the Sort, change the setting to Yes (Y).
Most demographics contain predefined options that will automatically appear for Sorters. However, some fields within the Job-Related and Geographic tabs allow you to enter custom values.
Employee-Specific Tab #
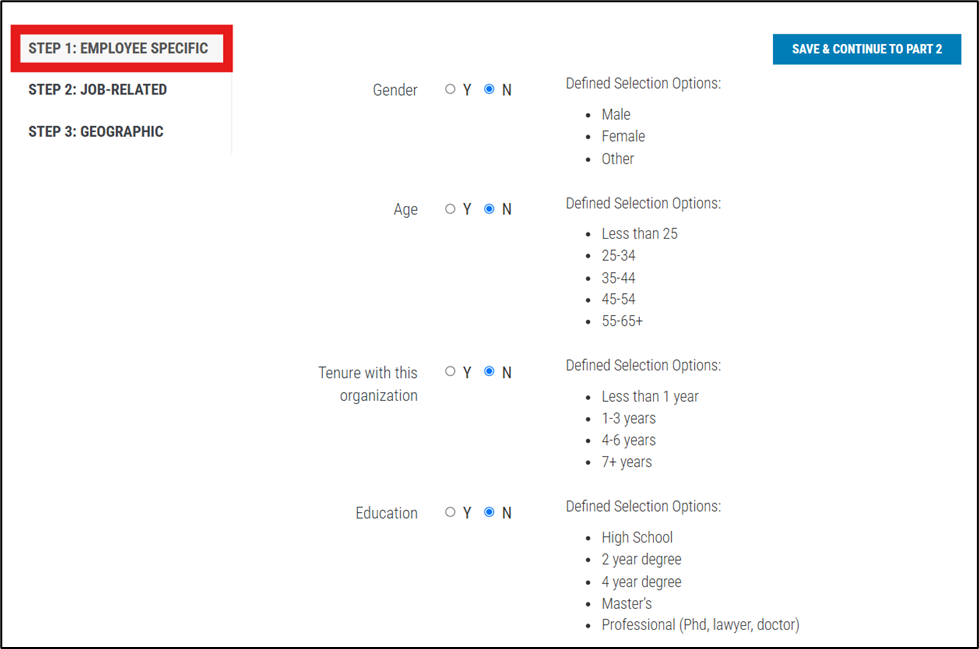
In this tab, you can include Sorter demographics related to individual background or employment:
- Gender – Male, Female, Other
- Age Range – Less than 25, 25-34, 35-44, 45-54, 55-65+
- Tenure with Organization – Less than 1 year, 1-3 years, 4-6 years, 7+ years
- Education Level – High School, 2-Year Degree, 4-Year Degree, Master’s, Professional (PhD, Lawyer, Doctor)
Use the Yes/No toggles to select which items appear in the Sorter demographic list.
Click Save & Continue to Part 2 to move forward.
Job-Related Tab #
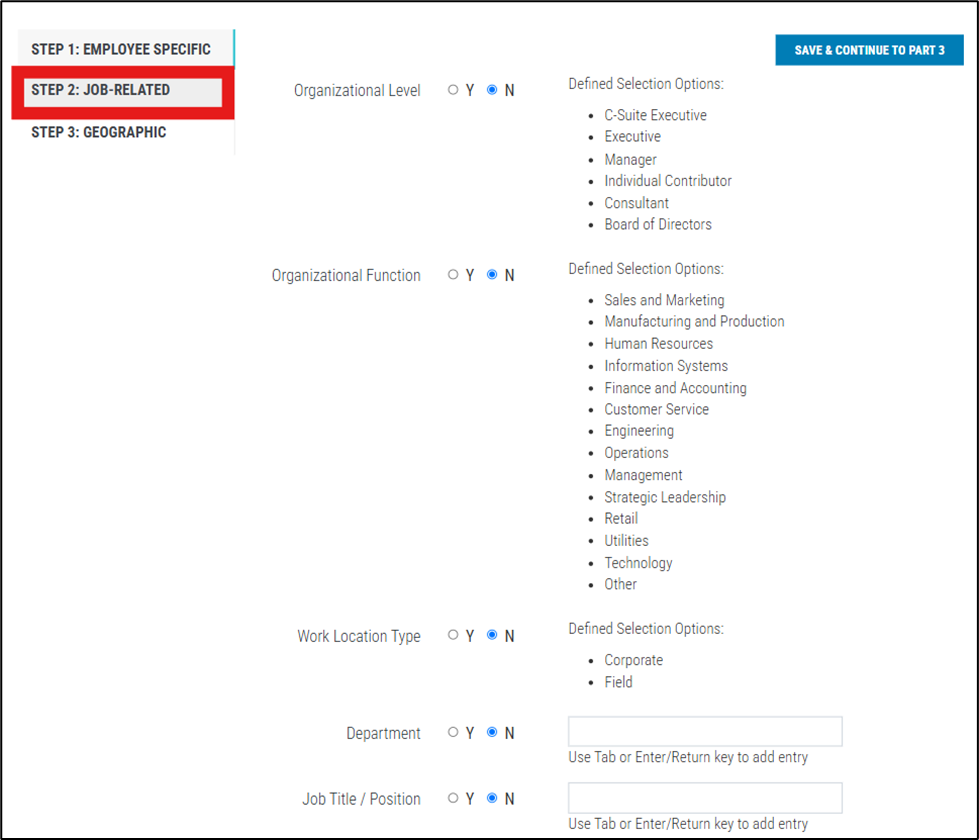
In this tab, define organizational attributes tied to each Sorter’s role:
- Organizational Level – Select from predefined options such as C-Suite, Manager, or Individual Contributor.
- Organizational Function – Choose from departments like Sales and Marketing, HR, Engineering, etc.
- Work Location Type – Select Corporate or Field.
- Department – Add department names that will appear as selectable options for Sorters.
- Job Title / Position – Add specific roles or titles.
To add custom entries, type the value and press Tab or Return.
Click Save & Continue to Part 3 when finished.
Geographic Tab #
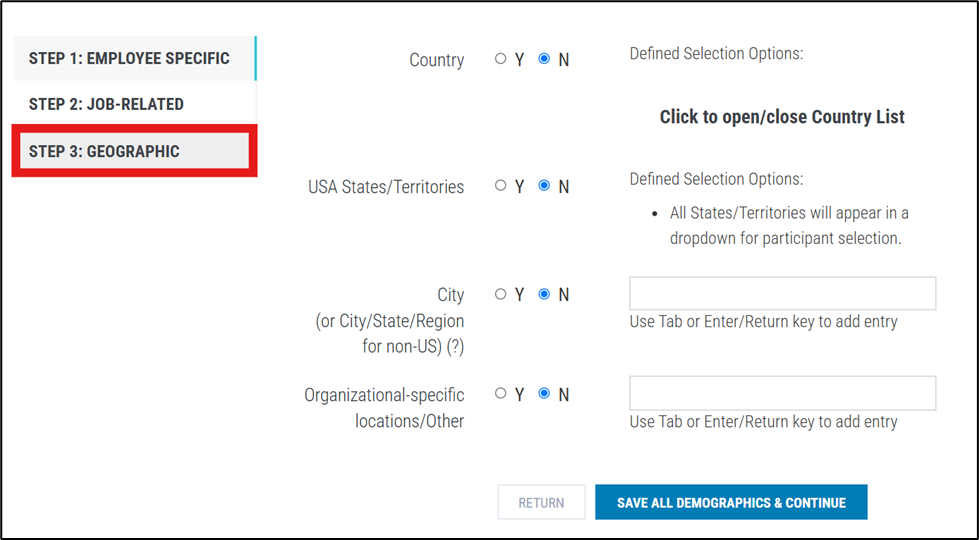
In this tab, define or customize location-based demographic options:
- Country – Click to open/close the country list.
- USA States / Territories – All states and territories appear in a dropdown.
- City (or Region) – Enter city or regional identifiers (for non-U.S. entries, include City/State/Region).
- Organizational-Specific Locations / Other – Add company-specific sites or other custom locations.
When all demographics are configured, click Save All Demographics & Continue to proceed to the next setup stage.
Step 3: Set Dates and Email Options #
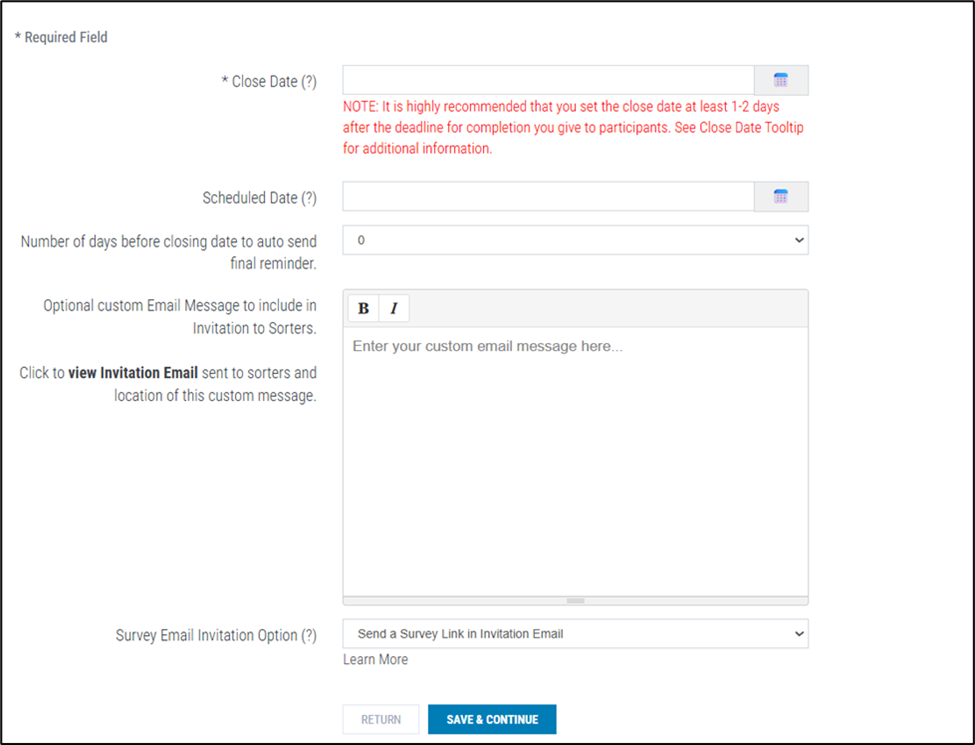
In this step, you’ll define the key dates and communication settings for your Virtual Sort Group. While only the Close Date is required, you can also schedule invitations, automate reminders, and personalize the invitation email sent to Sorters. Once the close date has passed, you can view your Virtual Sort Group at the Manage Archived Sort Groups menu which can be found at Digital Talent Tools → Virtual Card Sort Groups → Manage Archived Sort Groups.
Date Settings #
- Close Date – Sets the final deadline for Sorters to complete their Virtual Sort.
- Tip: It’s recommended to set the Close Date at least 1-2 days after the completion deadline provided to participants.
- Scheduled Date – (Optional) Choose a future date for the system to automatically send Sort invitations at 5:30 AM EST.
- Auto Final Reminder – Enter the number of days before the Close Date for the system to automatically send a final reminder to Sorters who have not yet completed their Sort.
Custom Email Message #
Add an optional personalized message to include in Sorter invitation emails. Click View Invitation Email to preview how your message appears within the final invitation layout.
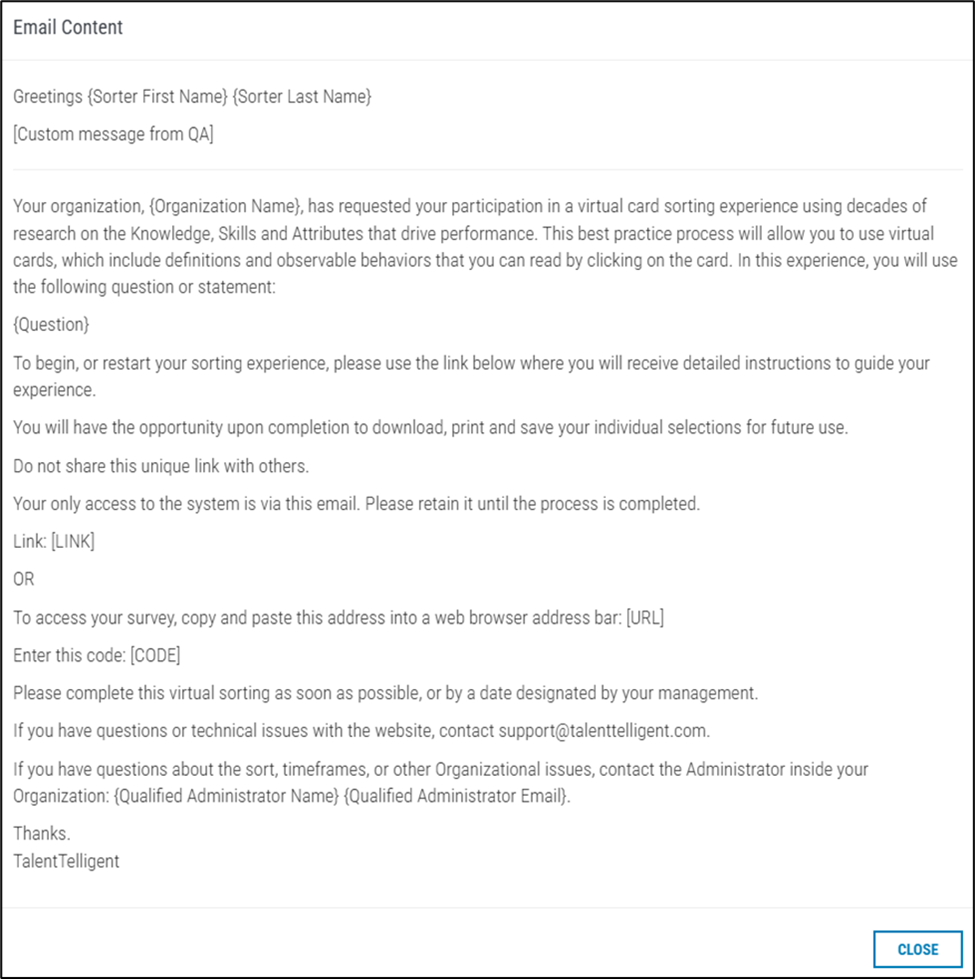
To preview displays the complete email text, showing your organization name, Sort question, and the location of your custom message.
Survey Email Invitation Options #
Choose how Sorters will receive their invitations:
- Direct Link – Sends each Sorter a unique email link that takes them directly into their Sort.
- URL and Code – Sends a general web address and access code that Sorters enter manually.
- This option is useful for organizations with strict email security policies that block hyperlinks.
If needed, TalentTelligent can assist with IT testing or coordinate directly with company administrators to ensure successful email delivery prior to launch.
Once all fields are set, click Save & Continue to move to the Review Sort Group Grid page.
Step 4: Add Sorters #
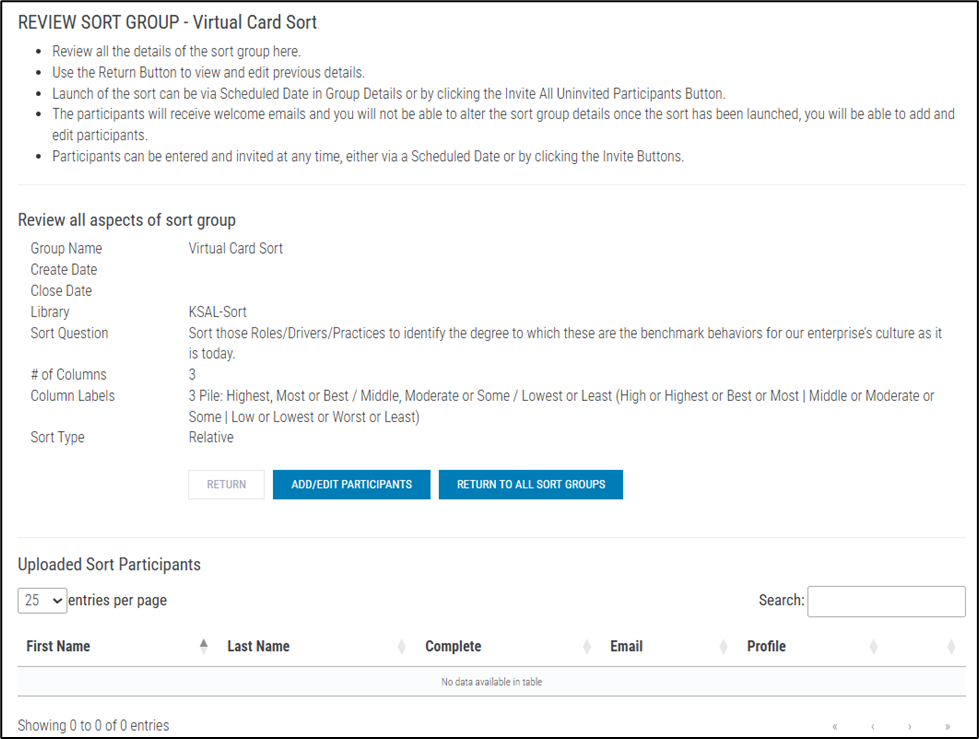
When you open Step 4, you’ll first see the Review Sort Group page. This page displays an overview of all group details before you begin adding or inviting Sorters.
On this page, you can:
- Review all group details such as Name, Create Date, Close Date, Library, Sort Question, and Column Labels.
- Use the Return button to go back and edit previous setup sections if needed.
- Click Add/Edit Participants to open the Manage Sorters page and begin adding Sorters.
- Launch the Sort using a Scheduled Date (set in Step 3) or by clicking Invite All Uninvited Participants.
- Add or invite participants at any time, either manually or via a scheduled invitation.
Manage Sorters Page #
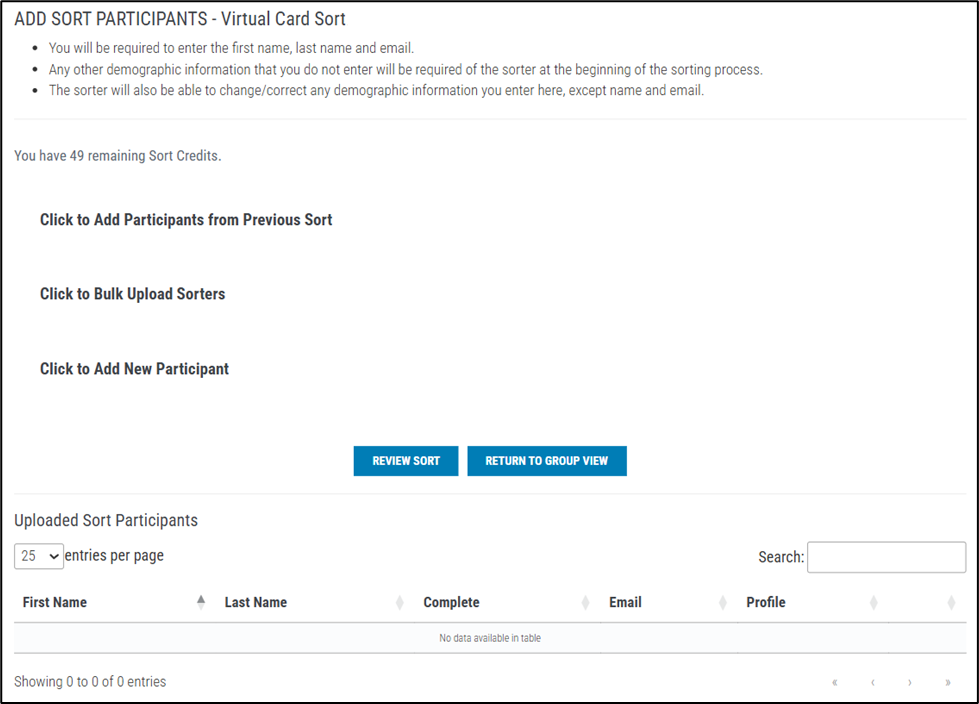
Before launch, no emails are automatically sent. The Qualified Administrator controls when the group begins. You may add, edit, or delete Sorters and adjust most settings as needed. Note: The only element that cannot be changed after creation is whether the group uses an existing custom sub-sort library.
After the group launches, only the Close Date and Sorter information can be modified. New Sorters can still be added, and they will receive their invitation email immediately.
If demographic information was included during setup, you can fill it in here, but it’s optional. Sorters will be asked to review, add, or confirm their demographic details before starting their Virtual Sort.
When all Sorters have been added, you can either click Review Sort to return to the Review Sort Group page and confirm details before invitations are sent, or click Return to Group View to go back to the main Sort Groups page to view all active and archived groups.
Ways to Add Sorters #
You can add Sorters in three different ways:
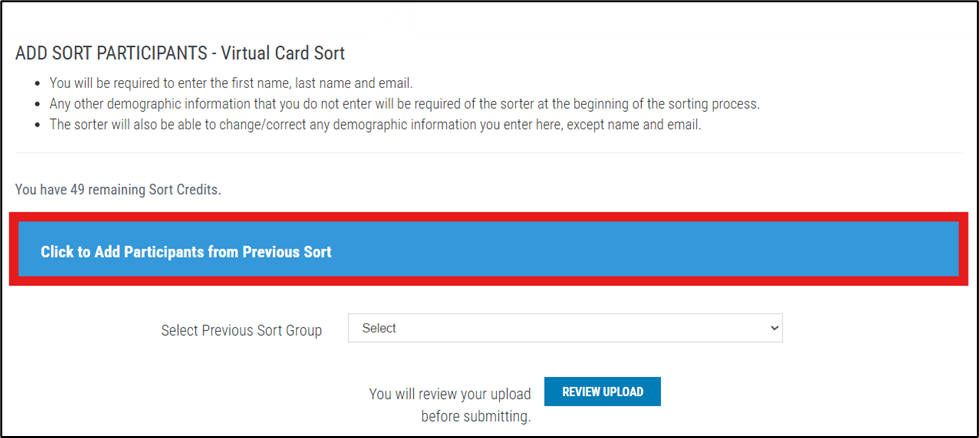
- Add Participants from Previous Sort – Select a previous Group and copy specific Sorters from that Group into this one.
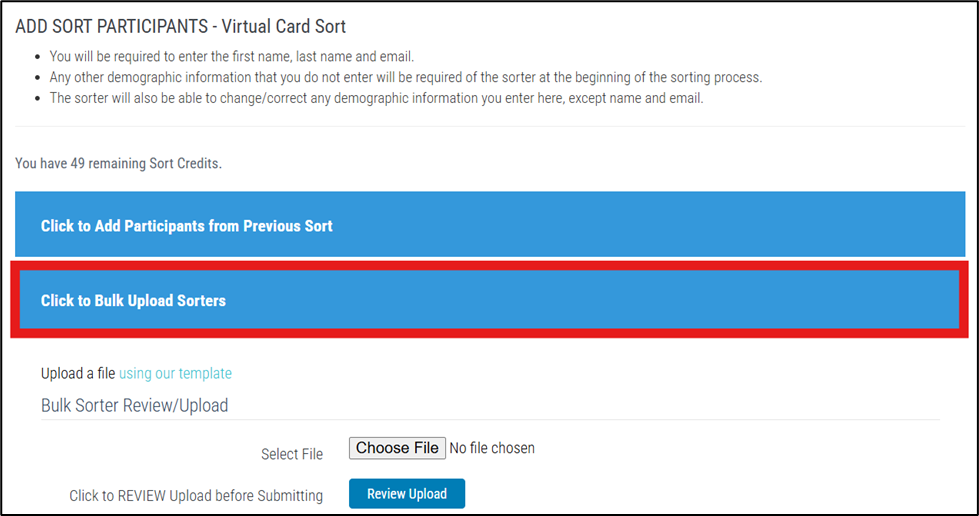
- Bulk Upload Sorters – Upload multiple Sorters at once using the provided Sorter Upload Template (.csv). Each Sorter’s first name, last name, and email address are required. Other demographic data can be added individually after upload. (Click here to download the Sorter Upload Template.)
- Add New Participant – Add individual Sorters manually by entering their first name, last name, and email address. Demographic fields are optional at this stage.
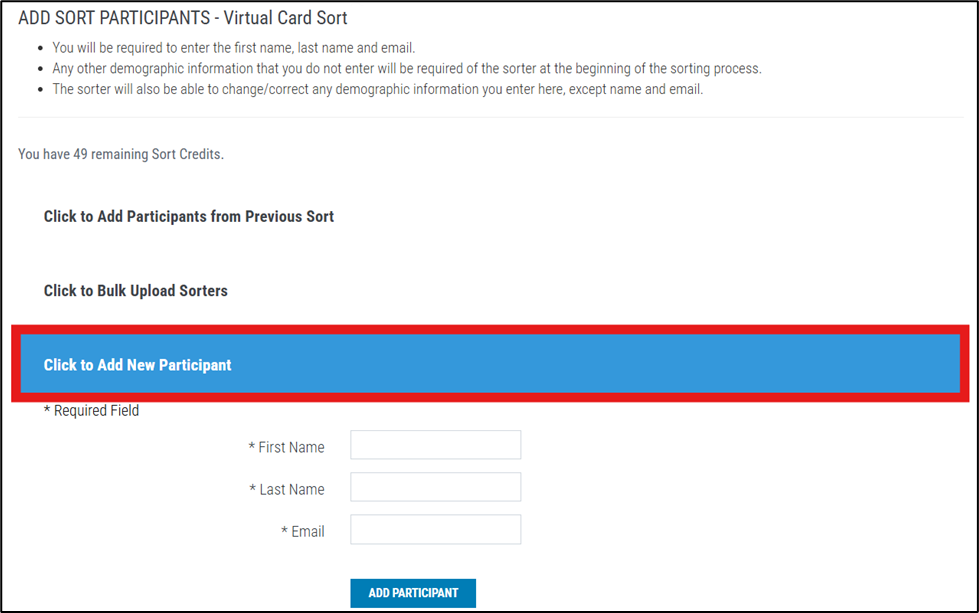
- If left blank, the Sorter will be prompted to complete them when opening their Virtual Sort.
- If entered, the Sorter will confirm them before starting.
Note: Sorters are not notified until the Group is launched through the Review & Invite page.
Step 5: Review and Invite #
Menu Path: Digital Talent Tools → Virtual Card Sort Groups → Review & Invite
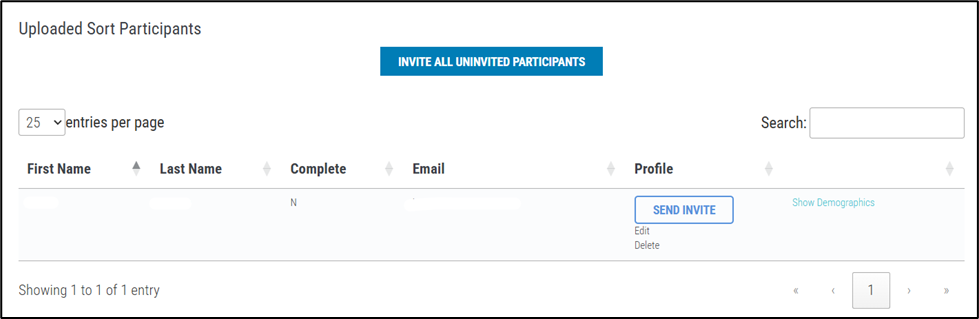
- After adding Sorters, review all Group details and prepare to send invitations. This page provides a complete overview of the Sort configuration so you can confirm every setting before launch. It is the same Review Group Sort Grid shown at the end of Step 1, now used to finalize your setup before invitations are sent.
- You can review all Group settings and invite Sorters when ready. You also have the option to invite all uninvited participants at once by clicking Invite All Uninvited Participants.
- Note: Select Add/Edit Participants to navigate to the Manage Sorters page if you need to add or edit Sorters before launching.
Manage and Launch #
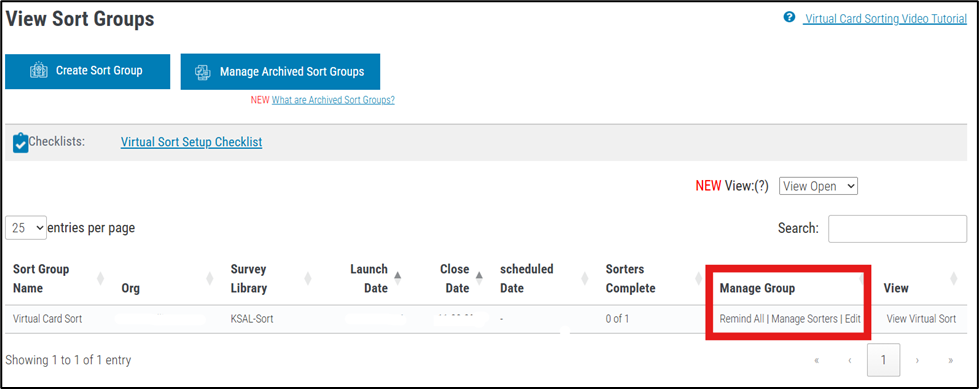
From the Digital Talent Tools → Virtual Card Sort Groups menu, you can access all core management options for Virtual Sorts, including:
- Remind All – Sends an email to all Sorters who have not completed their Sort.
- Edit Group – Opens the setup page for last-minute changes.
- Manage Sorters – Allows you to add, edit, or delete participants as needed.
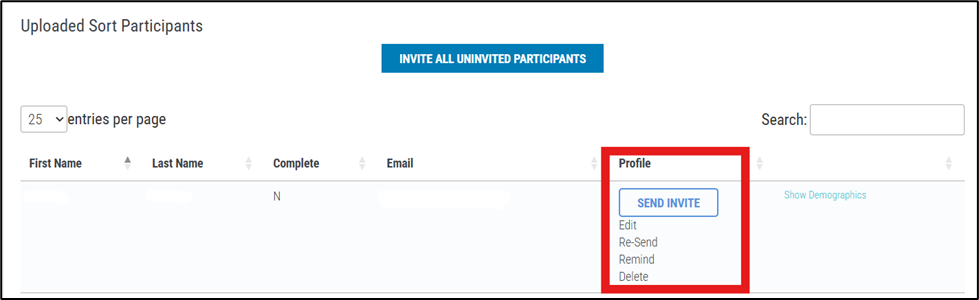
After invitations are sent, each Sorter’s Profile column provides direct action options: Edit, Re-Send, Remind, or Delete.
Once the Group is launched, the configuration becomes locked, and the Virtual Sort Dashboard will be accessible for tracking progress, viewing analytics, and generating reports.
Step 6: View Virtual Sort Dashboard #
Menu Path: Digital Talent Tools → Virtual Card Sort Groups → View Virtual Sort
Sort Details Tab #
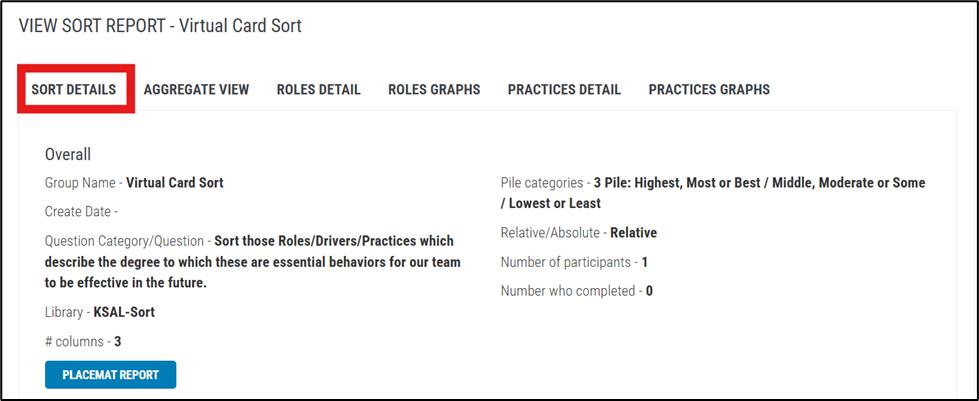
- This tab displays the details of the Sort, including:
- The number of Sorters invited and the number who have completed the Sort
- Whether the Sort was relative or absolute
- The Pile categories included
- If demographic information was added to the Sort, it is also shown here.
- You can select any filters on this tab to apply them across other tabs. Filters will only appear if demographic data was included in the Sort.
- A downloadable, printable Placemat Report is also available from this tab.
Aggregate View Tab #
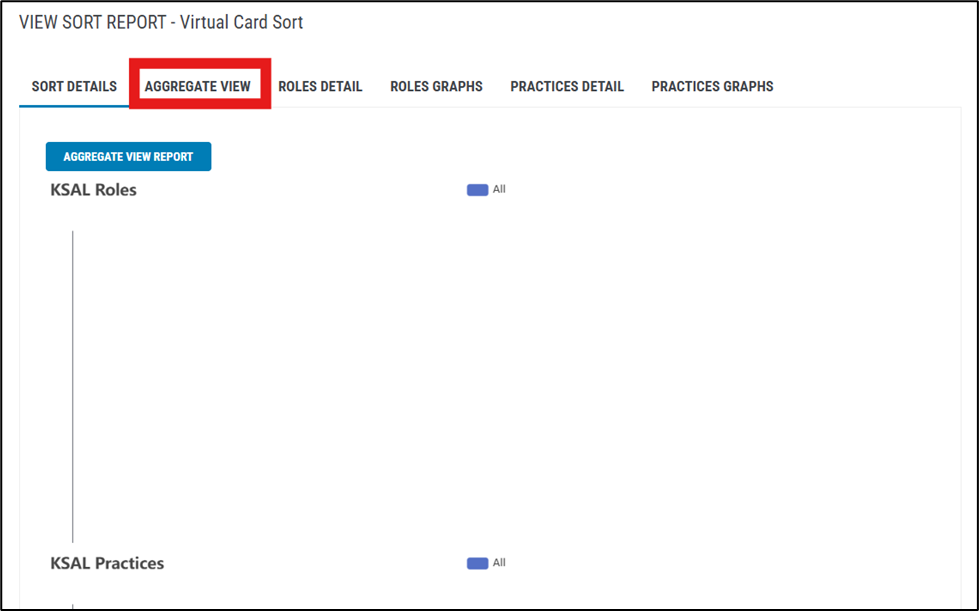
- This tab displays a bar graph of all Roles/Drivers and Practices from the Library used in the Sort.
- Hovering over a bar shows the full description of the Role/Driver or Practice.
- An Aggregate View Report can be generated by selecting the Aggregate View Report button.
Roles Detail Tab #
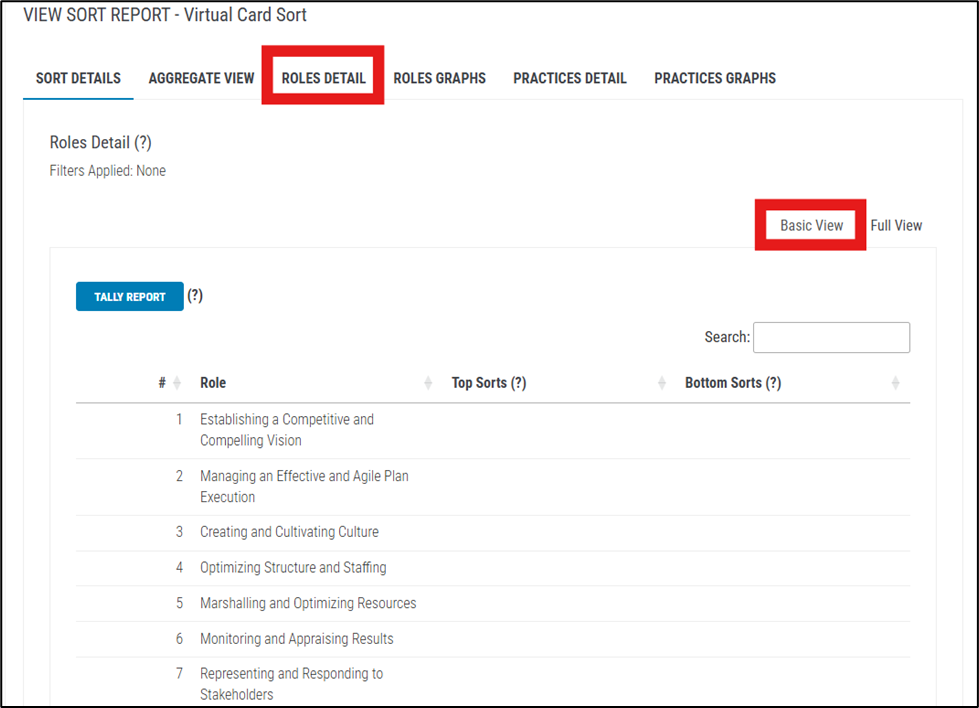
This tab has two sub-tabs: Basic View and Full View.
In both sub-tabs, you can change how the data is displayed using the arrow controls:
- Roles column arrows sort items alphabetically.
- Top Sorts arrows group together all Top Sorts.
- Bottom Sorts arrows group together all Bottom Sorts.
These groupings are reflected in both the Tally Report and the Detail Report.
- In the Basic View, a Tally Report can be generated by selecting the Tally Report button. The report distinguishes between Top, Middle, and Bottom Sorts.
- In the Full View, a Detail Report can be generated by selecting the Detail Report button. This report includes everything in the Tally Report plus the Weighted Difference, Aggregate Average, and Agreement Statistics for the Sort.
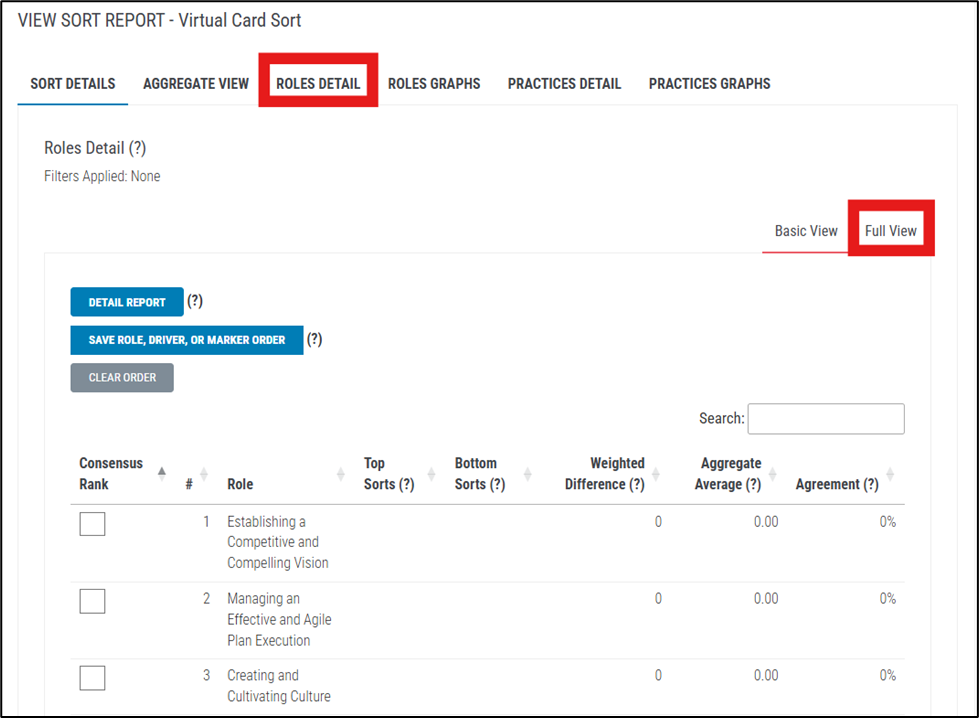
- You can manually set the rank of each Role in the Sort Group using the Consensus Rank column in the Full View sub-tab. The order can be saved by selecting Save Role, Driver, or Marker Order. The Detail Report reflects this saved ranking, and its tables are ordered accordingly.
Roles Graphs Tab #
- Filters do not display on this tab.
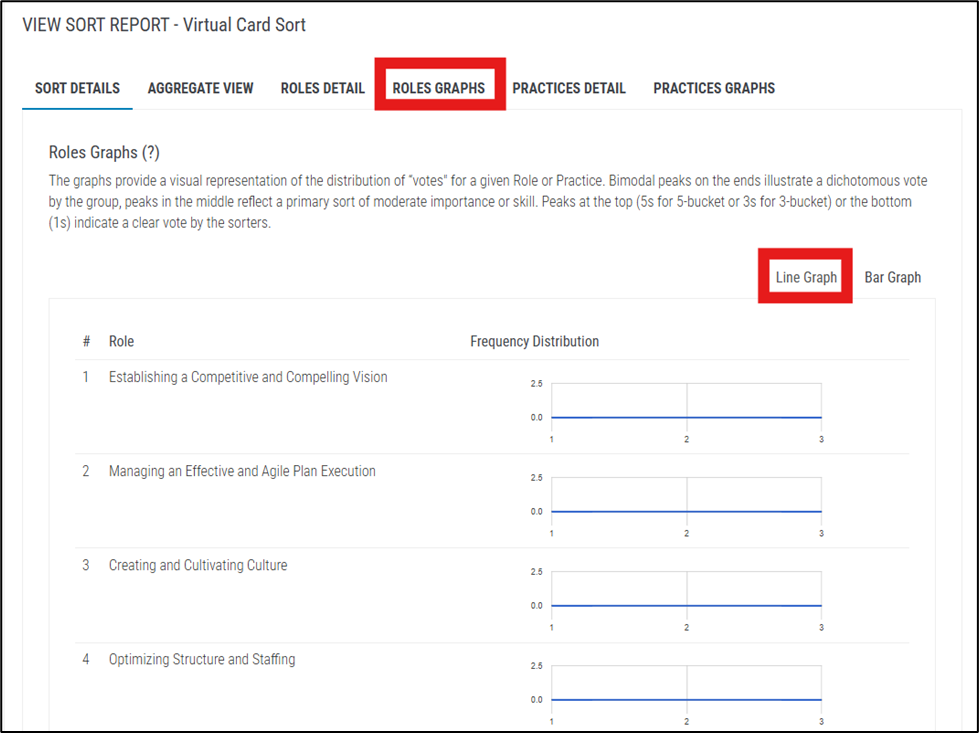
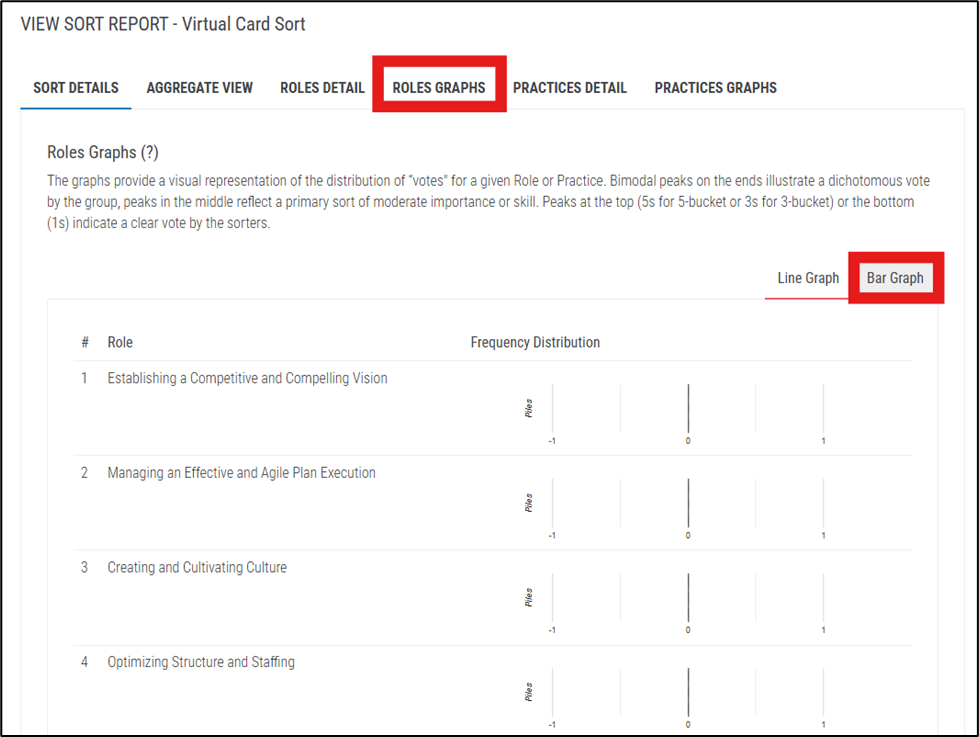
- This tab provides a visual representation of the distribution of votes for each Role in the Sort. The graphs help illustrate how Sorters ranked the Roles and highlight patterns in group responses.
- You can view this information using two sub-tabs:
- Line Graph – Displays the frequency distribution of each Role across the selected scale.
- Bar Graph – Shows the same distribution using bar visuals for easier comparison between Roles.
- Line Graph – Displays the frequency distribution of each Role across the selected scale.
Practices Detail Tab #
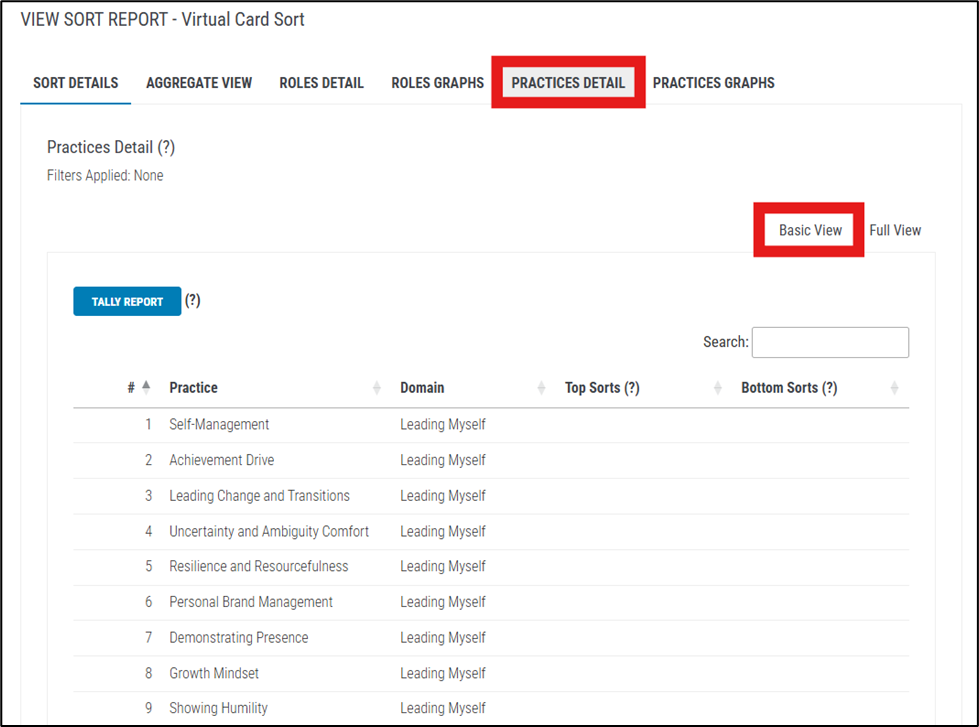
This tab also includes two sub-tabs: Basic View and Full View.
In both sub-tabs, you can change how the data is displayed using the arrows:
- The arrows sort the Practices and Domain columns alphabetically.
- The Top Sorts arrows group together all Top Sorts.
- The Bottom Sorts arrows group together all Bottom Sorts.
These groupings are reflected in both the Tally Report and the Detail Report.
- In the Basic View, a Tally Report is generated by selecting the Tally Report button. This report distinguishes between Top, Middle, and Bottom Sorts.
- In the Full View, a Detail Report can be generated by selecting the Detail Report button. This report includes everything in the Tally Report plus the Weighted Difference, Aggregate Average, and Agreement Statistics for the Sort.
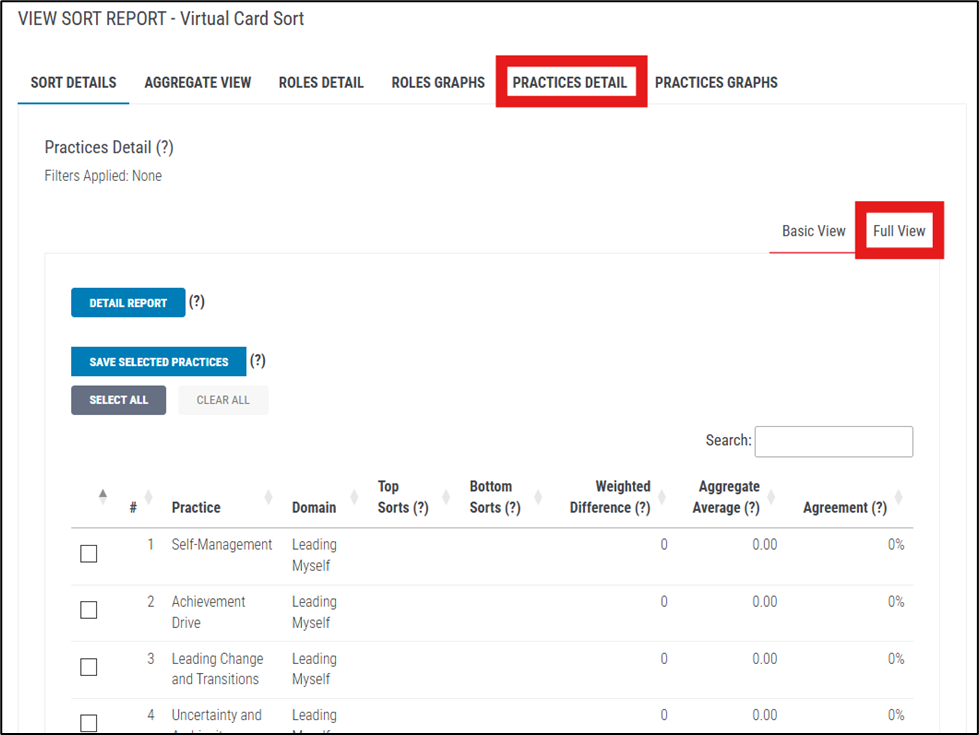
- You can also select specific Practices to be saved as a sub-set using the # column in the Full View sub-tab.
Practices Graphs Tab #
- Filters do not display on this tab.
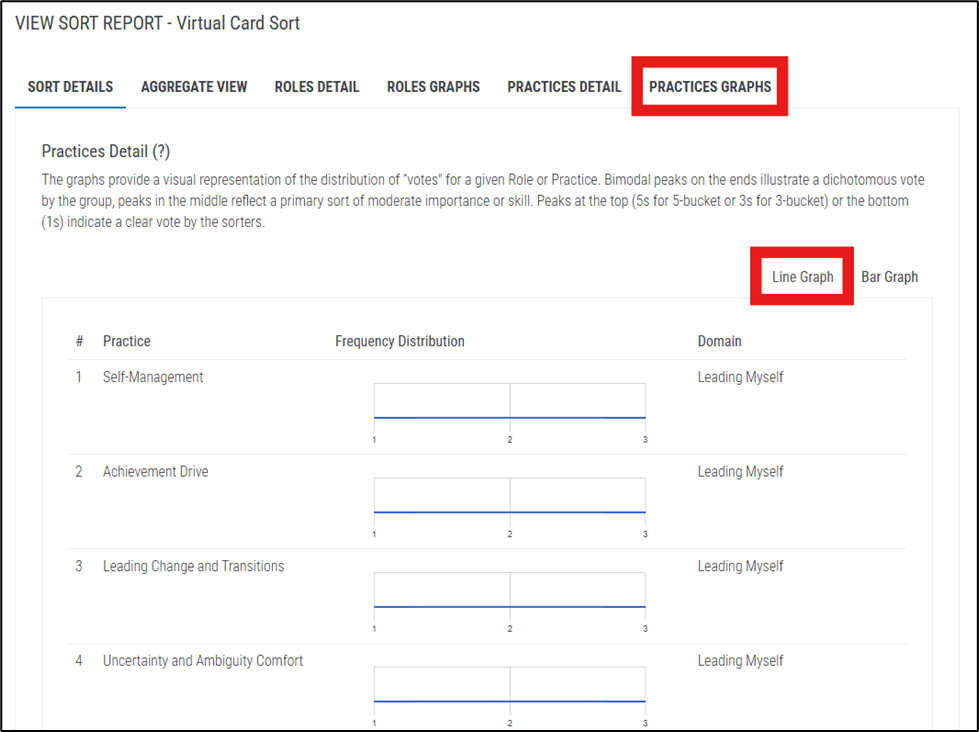
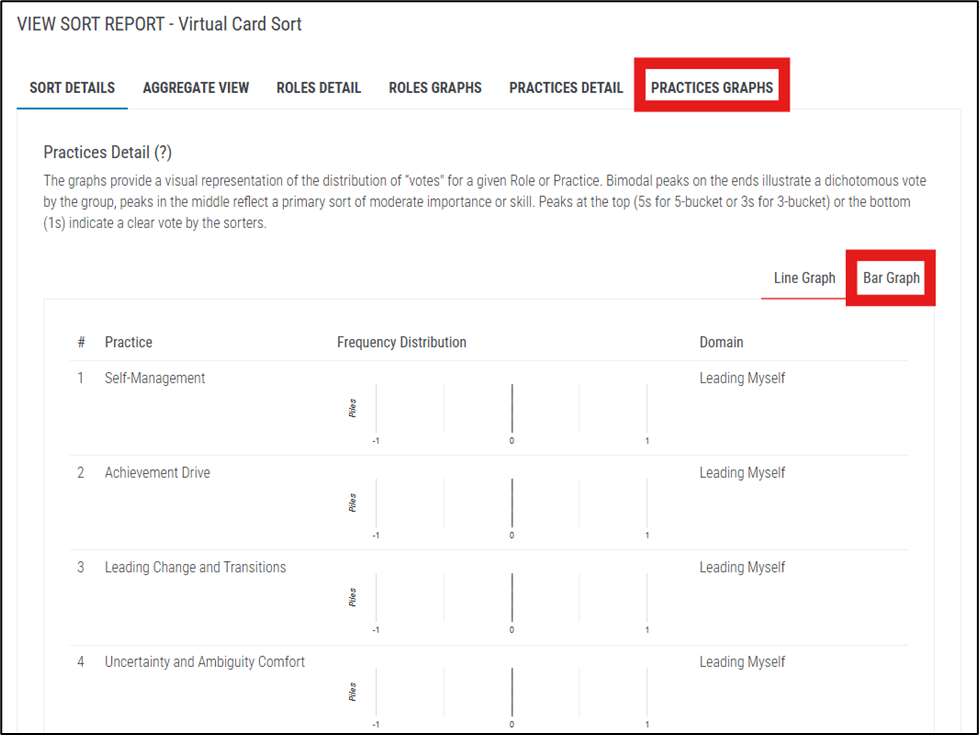
- This tab provides a visual representation of the distribution of votes for each Practice. It displays frequency distribution graphs that illustrate how Sorters ranked each Practice within the selected library.
- Two sub-tabs are available:
- Line Graph – Displays each Practice as a continuous distribution across the sorting categories.
- Bar Graph – Displays each Practice as a discrete count of votes within each category.
- Line Graph – Displays each Practice as a continuous distribution across the sorting categories.
- Both views help visualize trends across Sorters, showing where consensus or variation exists in the sorting results.
Conclusion #
The Virtual Card Sort process enables Qualified Administrators to efficiently design, launch, and review sorting experiences that capture valuable insights from participants. By following these steps, you can create Sort Groups, invite Sorters, and analyze results through the Virtual Sort Dashboard to support informed decision-making and organizational development. For additional guidance, visit the Help Center under Help/Contact.