
Introduction #
The Career Blueprint tool enables Qualified Administrators to create development experiences that connect individual goals with organizational priorities. It allows you to control how learners interact with the Career Blueprint and how much choice they have throughout the process.
Learners complete a Virtual Card Sort by organizing two piles of behavior cards from the KSAL (Leader), KSAM (Manager), or KSAI (Individual Contributor) libraries. Depending on how the Blueprint is set up, learners may select their own library and sorting question, or they may follow the focus defined by the administrator.
After completing their sort, learners gain access to the Career Architect Development Dashboard, where personalized development tools and insights become available.
Step 1: Create a Career Blueprint #
Menu Path: Digital Talent Tools → Career Blueprint → Create Career Blueprint
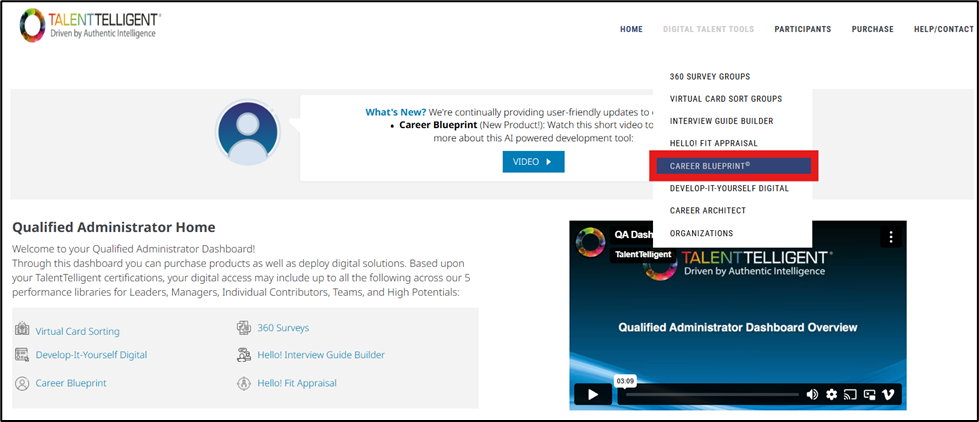
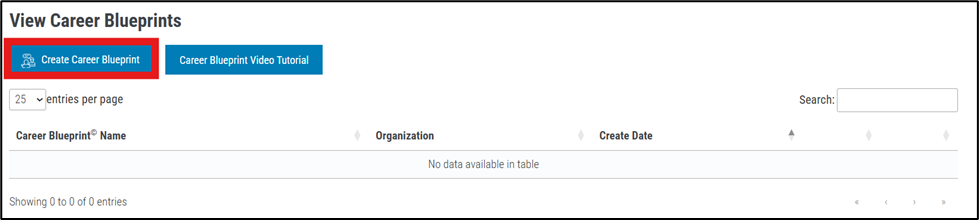
This opens the Career Blueprint setup screen, where you begin creating a new Career Blueprint.
Starting a New Career Blueprint #
Complete the form on the Create Career Blueprint screen.
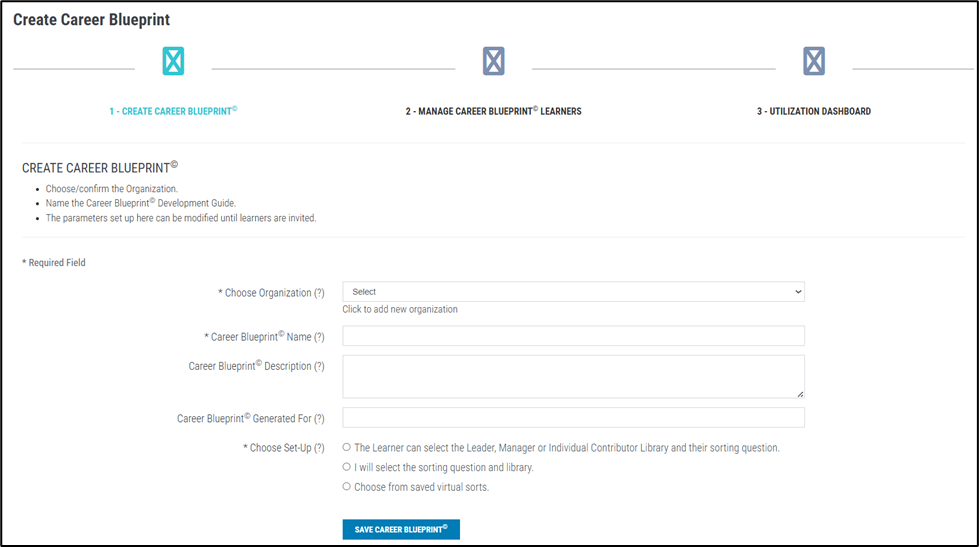
- *Choose Organization – Select your organization from the dropdown. If it is not listed, create it in the Qualified Administrator Portal before continuing.
- *Career Blueprint Name – Enter a name used for internal administrative reference. This name is not visible to learners.
- *Career Blueprint Description (Optional) – Enter an internal description for recordkeeping or added context. This field is not visible to learners.
- Career Blueprint Generated For (Optional) – Indicate who the Career Blueprint is intended for, such as a learner, team, department, or role.
- *Choose Set-Up – Select how learners will complete their Career Blueprint. This determines who selects the library, which sorting question is used, and how much choice learners have in their experience.
- You must select one of the three setup options discussed below.
Set-Up Options #
Option 1 – Learner Selects Library and Question
- Learners choose the library they will sort from.
- Learners choose the sorting question they will answer.
- This option allows learners to personalize their Career Blueprint experience.
Option 2 – Administrator Selects Library and Question
- All learners sort the same behaviors using the same instruction.
- You must complete two required fields:
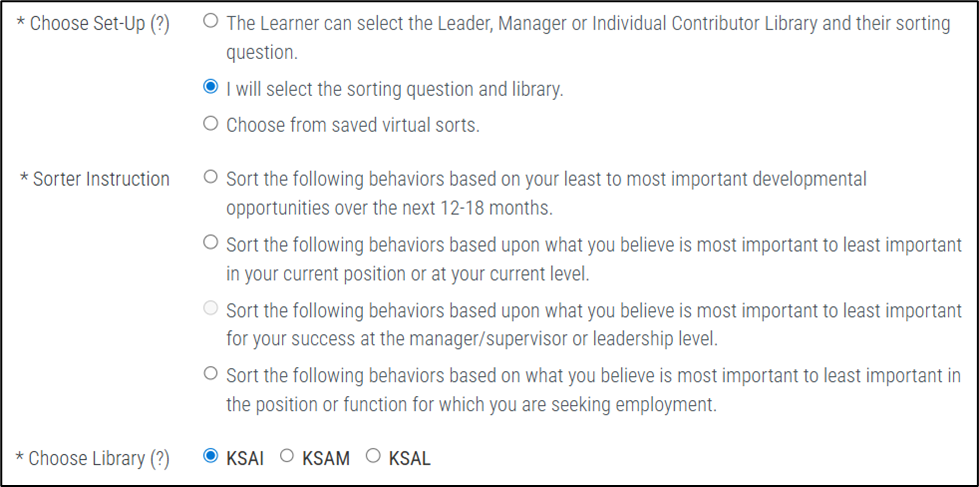
- Sorter Instruction – Select the instruction learners will see. This tells learners how to sort the behaviors and what they should focus on during their sort.
- Choose Library – Select the library used for the sort: KSAI, KSAM, or KSAL.
Option 3 – Choose from Saved Virtual Sorts
- Use this option when you want to reuse a Virtual Sort that has already been created and saved.
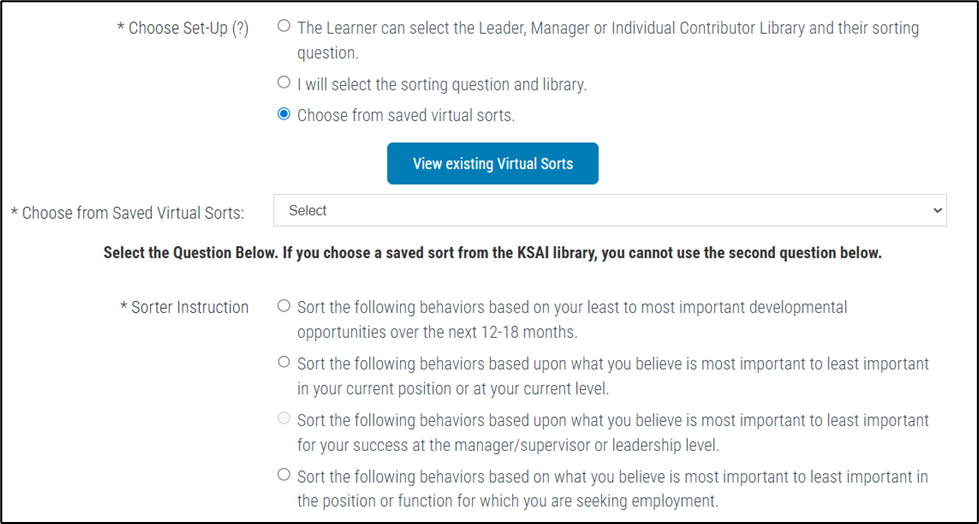
- Click View Existing Virtual Sorts to review available sorts.
- Select a saved sort from the dropdown list.
- Choose the Sorter Instruction learners will see during their sorting experience.
- The selected Virtual Sort determines which roles and practices are included in the sort.
Preparation Required for Option 3
- Go to Digital Talent Tools → Virtual Card Sort Groups → View Virtual Sort.
- Open the Practices Detail or Roles Detail tab.
- Select the Full View sub-tab.
- Choose the practices to include and click Save Selected Practices.
Important #
- After the first learner invitation is sent, the setup option, library, and sorting question cannot be edited.
- Review all selections carefully before sending invitations.
- Click Save Career Blueprint to continue.
Step 2: Add Career Blueprint Learners #
After clicking Save Career Blueprint in Step 1, you are taken to the Manage Career Blueprint Learners page. This page is used to enter the learners who will complete the Career Blueprint.
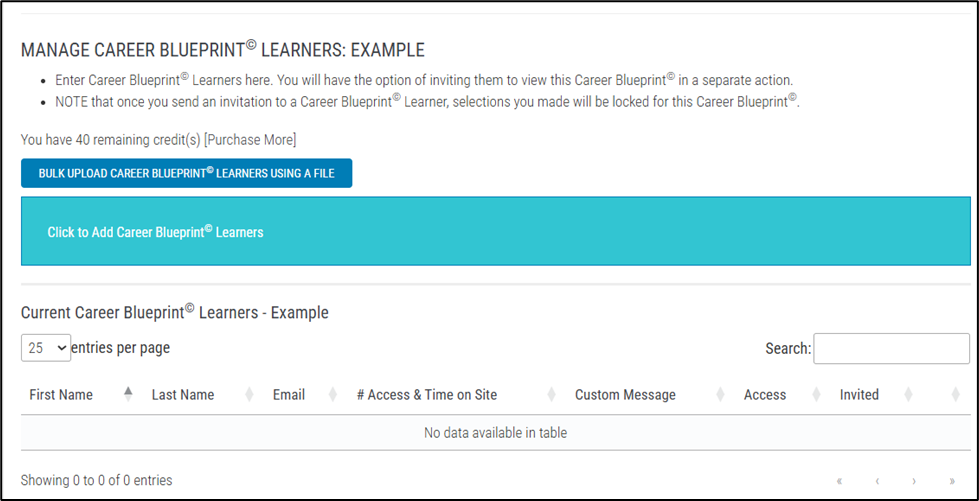
- Learners can be added now and invited later.
- Career Blueprint Credits must be available before learners can be added.
- Your remaining credit balance is displayed at the top of the page.
- Once an invitation is sent, Career Blueprint setup selections become locked and cannot be edited.
Add Learners #
You add learners on the Manage Career Blueprint Learners page. Once added, learners appear in a table at the bottom of the screen where you can manage invitations and learner access.
You can add learners in two ways:
- Bulk Upload Learners – Upload a CSV file that includes each learner’s first name, last name, and email address. Use the provided template to ensure proper formatting, then click Import to confirm.
- Add Learners Manually – Enter a learner’s first name, last name, and email address directly on the screen. You may also include an optional custom message that will appear in the learner’s invitation email. Click Save to add the learner.
After Learners Are Added #
Once learners are added, they appear in the Current Career Blueprint Learners table.
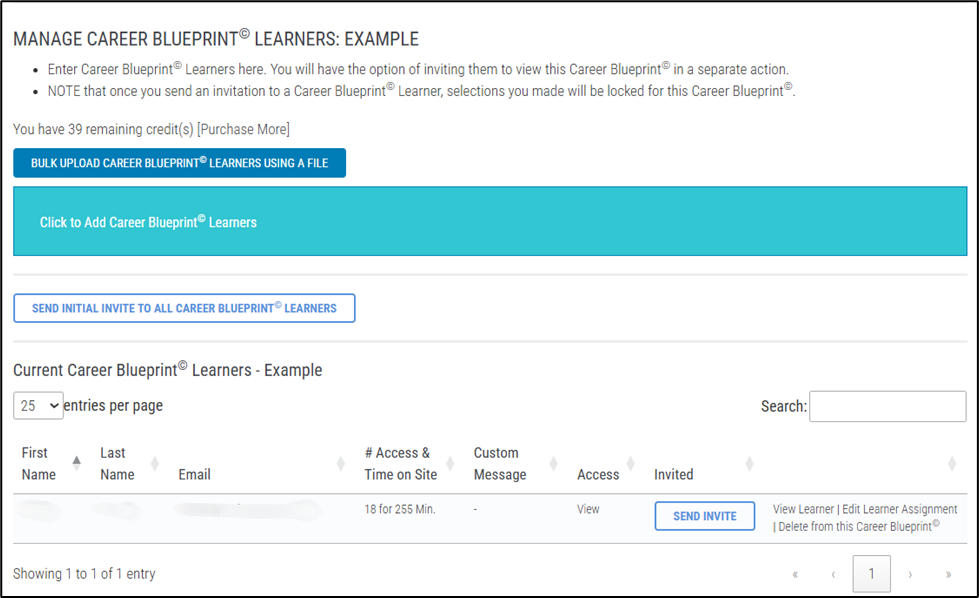
This table displays:
- First and last name
- Email address
- Number of times the learner has accessed the Career Blueprint and total time spent on site
- Custom invitation message
- Access status
- Invitation date and status
From this table, you can manage each learner by selecting the available actions:
- Send Invite – Sends the learner their access invitation
- Resend – Sends the invitation again if needed
- Edit Learner Assignment – Updates learner information or assignment details
- Delete – Removes the learner from the Career Blueprint
Sending Invitations #
Once learners are added:
- Click Send Invite next to an individual learner to send their invitation
- Click Send Initial Invite to All Learners to send invitations to all learners at once
Once invitations are sent, learners receive an email with a secure access link and instructions for completing their Career Blueprint.
Step 3: Utilization Dashboard #
Use the Utilization Dashboard to review learner activity and Career Blueprint results. Access this dashboard by clicking the Utilization Dashboard icon in the Career Blueprint navigation bar.
Career Blueprint Details #
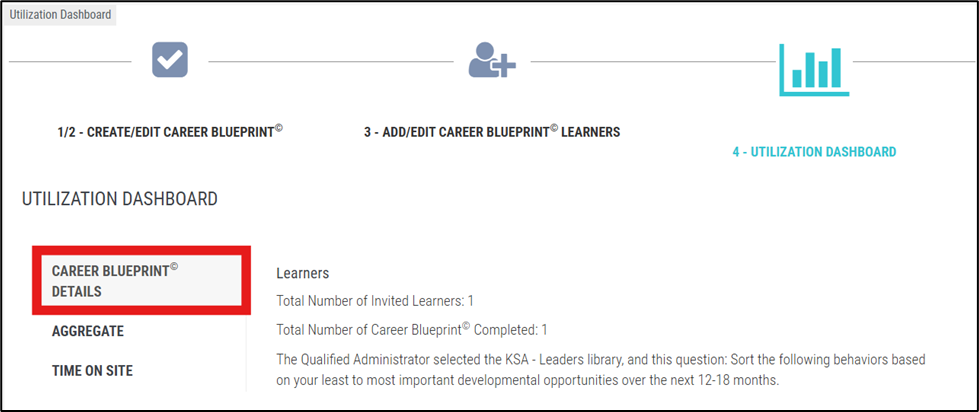
- Displays the total number of invited learners
- Displays the total number of learners who have completed their Career Blueprint
- Displays the library and sorting instruction used for this Career Blueprint
Aggregate #
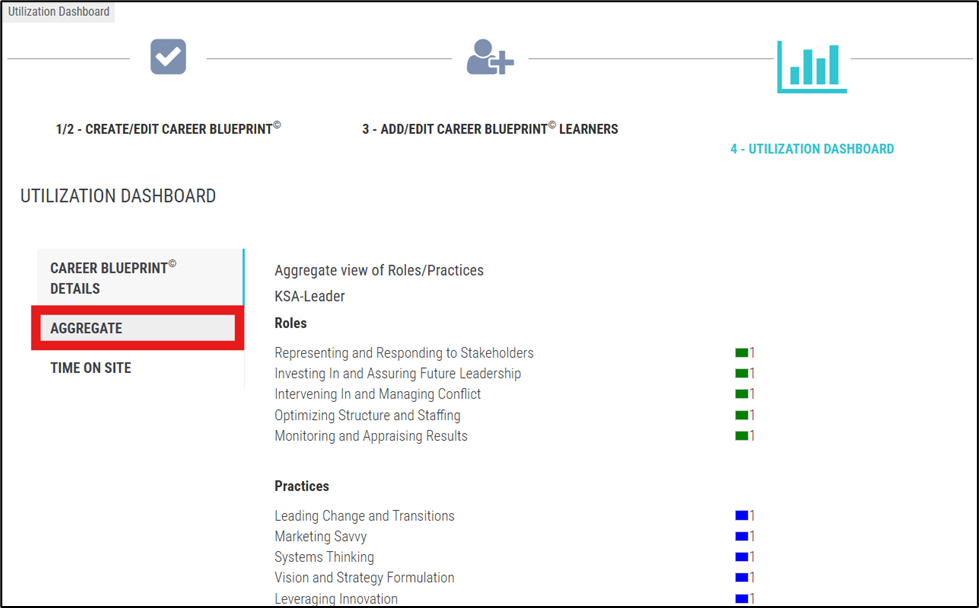
- Displays combined learner results for Roles and Practices
- Shows how frequently each Role and Practice was selected across all learners
- Helps identify shared development priorities and trends
Time on Site #
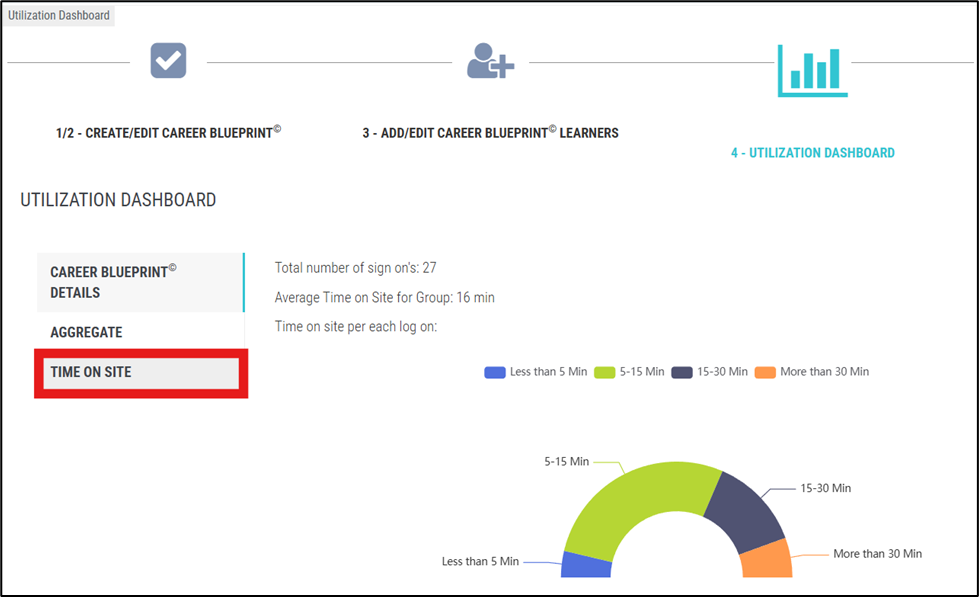
- Displays the total number of learner sign-ins
- Displays the average time learners spent in their Career Blueprint experience
- Displays time-on-site ranges, including:
- Less than 5 minutes
- 5-15 minutes
- 15-30 minutes
- More than 30 minutes
- Helps measure overall learner engagement and participation levels
- Note: Time on Site reflects the total time a learner has spent across all Career Blueprints they have interacted with, not just the Blueprint currently being viewed.
Conclusion #
The Career Blueprint tool provides a structured way to guide learner development while aligning individual growth with organizational priorities. Administrators control how the experience is set up and how learners interact with it.
Learners receive a personalized development experience based on their Virtual Card Sort results. This helps them better understand which behaviors and skills are most important for their role and growth.
The Utilization Dashboard gives administrators clear visibility into participation, engagement, and overall trends.
By following the steps in this guide, organizations can deliver a consistent and meaningful development experience that supports both individual growth and organizational goals.