
- Introduction
- Step 1: Navigate to the Fit Appraisal Tool
- Step 2: Review the Fit Profile Overview
- Step 3: Using an Existing Virtual Sort (Optional)
- Step 4: Starting a New Fit Profile
- Step 5: Fit Profile Dashboard
- Step 6: Fit Profile Details
- Step 7: Fit Profile Sorters
- Step 8: Roles
- Step 9: Practices
- Step 10: Optional Questions
- Step 11: Finalize Profile
- Step 12: Candidate Groups
- Step 13: Creating a New Candidate Group
- Step 14: Fit Candidate Group Dashboard
- Step 15: Candidate Completion and Metrics Display
- Conclusion
Introduction #
This documentation provides step-by-step instructions for setting up and using the Hello! Fit Appraisal tool. It takes you through the entire process in sequence, beginning with profile creation and ending with candidate evaluation. By following these steps, you will learn how to configure, manage, and deliver Fit Appraisals that ensure consistency and professionalism throughout your organization’s hiring process.
Step 1: Navigate to the Fit Appraisal Tool #
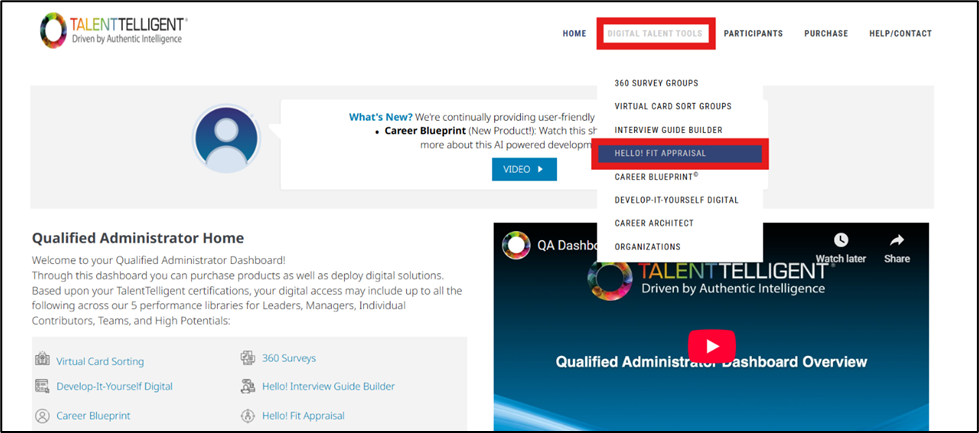
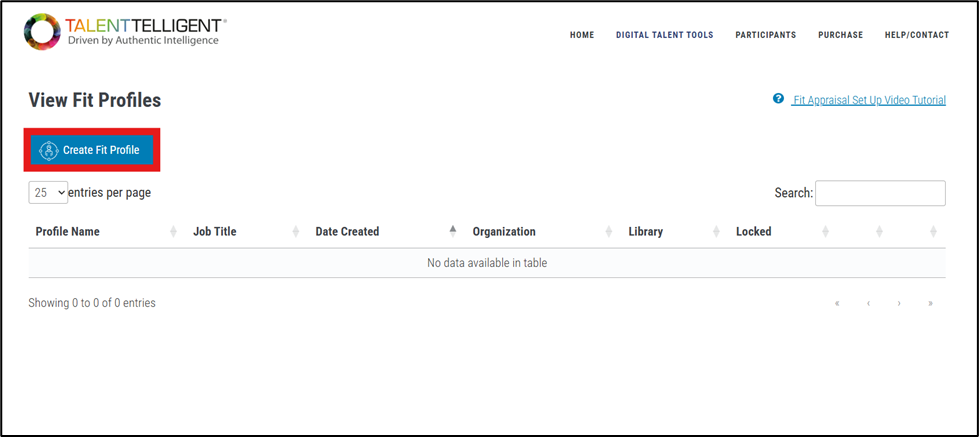
- From the main menu, go to Digital Talent Tools → Hello! Fit Appraisal → Create Fit Profile.
- This opens the Fit Profile setup screen where you begin the process.
- A Fit Appraisal Set Up Video Tutorial is also available to watch on this screen for additional guidance.
Step 2: Review the Fit Profile Overview #
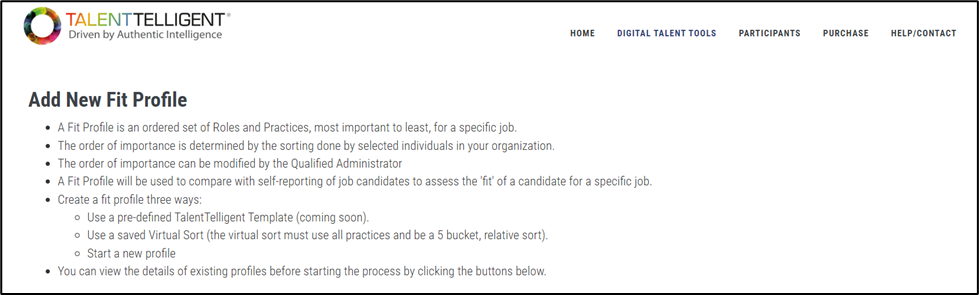
On this page, you’ll see an explanation of what a Fit Profile is and how it is used:
- A Fit Profile is an ordered list of roles and practices, ranked from most important to least important for a specific job.
- The order is determined by individuals in your organization and can be modified by a Qualified Administrator.
- The profile is later compared with candidate responses to evaluate their “fit” for the role.
- You can create a profile in three ways:
- Use a TalentTelligent Template (coming soon).
- Use a saved Virtual Sort (must include all practices and use a 5-bucket relative sort).
- Start a new profile.
Step 3: Using an Existing Virtual Sort (Optional) #
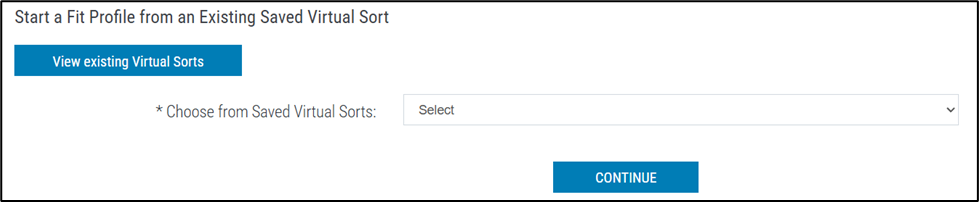
- Click View existing Virtual Sorts. A new page will open showing any previously saved Virtual Sorts.
- If you do not have any saved Virtual Sorts, the list will be empty and the dropdown under Saved Virtual Sorts will not display any options.
- If you do have existing sorts, choose one from the dropdown under Saved Virtual Sorts.
- Click Continue to proceed.
Step 4: Starting a New Fit Profile #
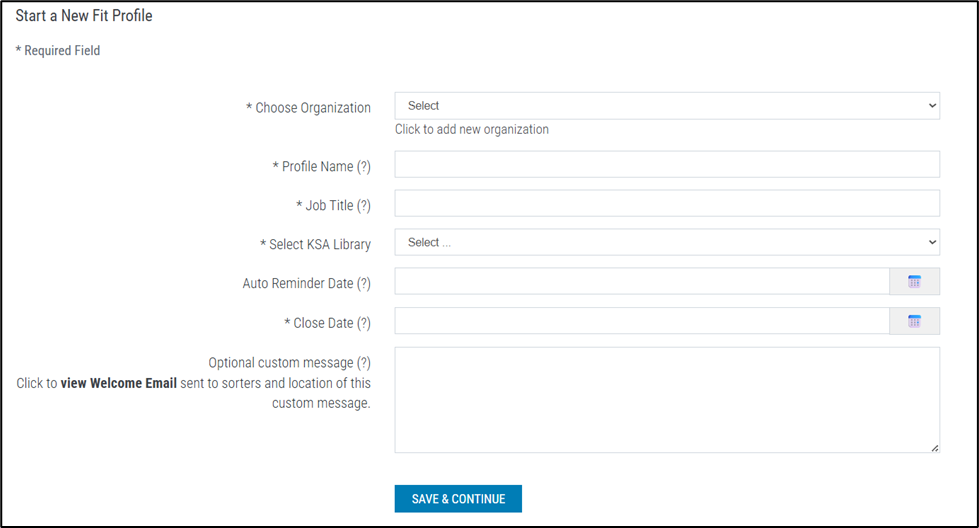
If you are creating a profile from scratch, fill out the form:
- Choose Organization – Select your organization from the dropdown. If it isn’t listed, click “Click to add new organization” (directly under the dropdown) to create one, then select it.
- Profile Name – Enter a descriptive name to help you categorize and locate the profile later (e.g., “Sales Manager Profile”). This name is for internal use only and is not displayed to participants.
- Job Title – Enter the job title for the position you are filling. This title will be visible to both the profile sorter and job candidates during their sorting experience.
- Select KSA Library – From the dropdown menu, choose the Knowledge, Skills, and Abilities (KSA) library that best matches the role:
- KSAL: Effective Leader – For leadership roles requiring decision-making, strategy, and leading others.
- KSAM: Effective Manager – For managerial roles focused on supervising teams and daily operations.
- KSAI: Individual Contributor – For roles centered on independent, specialized contributions without direct management.
- Auto Reminder Date (Optional) – If set, profile sorters who haven’t completed the sort will automatically receive a reminder email on the date you choose.
- Close Date – Set the date when the profile will close. After this date, no further sorting can be done.
- Optional Custom Message – Add a personalized note that will appear in the invitation email sent to sorters. (Click view Welcome Email to preview the default version and see where your custom message will appear.)
Click Save & Continue when finished.
Step 5: Fit Profile Dashboard #
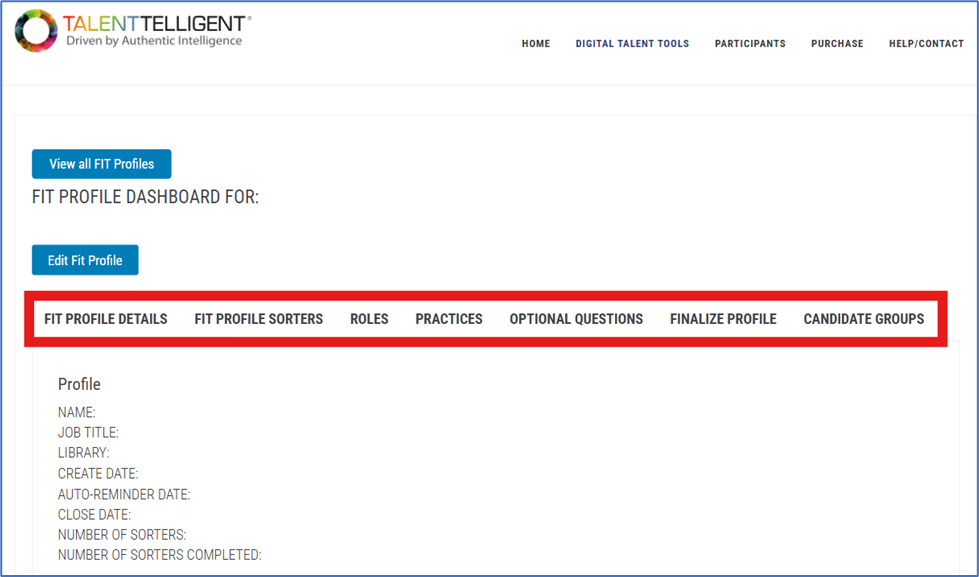
After saving, you’ll be taken to the Fit Profile Dashboard. Navigation is done through the taskbar at the top, moving through the following tabs:
- Fit Profile Details.
- Fit Profile Sorters.
- Roles.
- Practices.
- Optional Questions.
- Finalize Profile.
- Candidate Groups.
Step 6: Fit Profile Details #
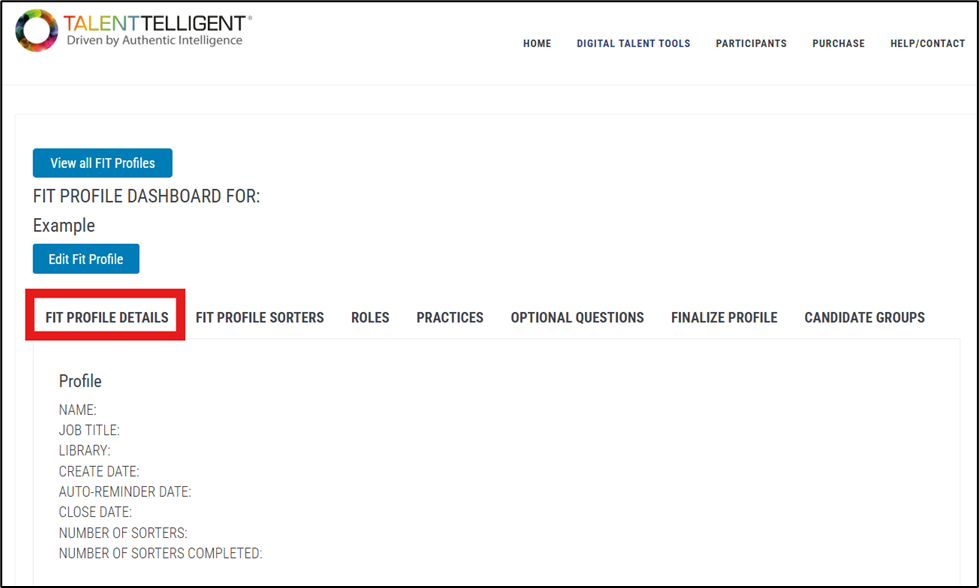
- Displays the basic information entered earlier (Profile Name, Job Title, KSA Library, Create Date, Reminder Date, and Close Date).
- Also shows the Number of Sorters assigned and the Number of Sorters Completed. These will both display 0 initially until sorters are added and complete their assignments.
- Click Edit Fit Profile if changes are needed.
Step 7: Fit Profile Sorters #
- This section allows you to assign individuals (called Profile Sorters) who will complete the sorting exercise for the profile. Sorters determine the relative importance of Roles and Practices, which builds the Fit Profile.
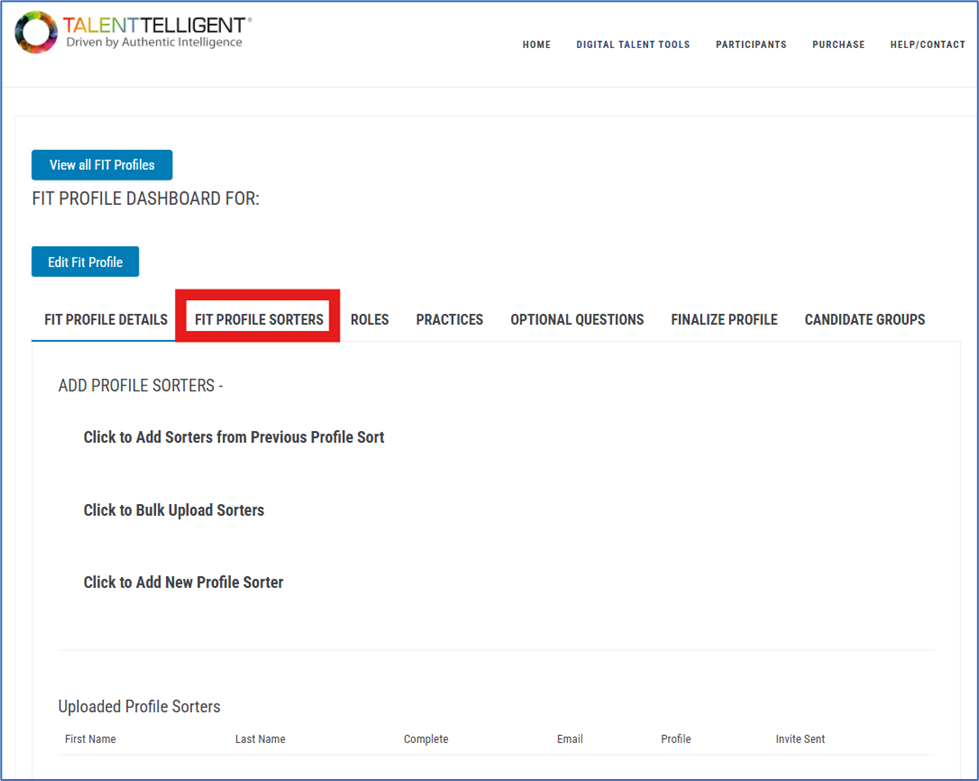
You can add sorters in three ways:
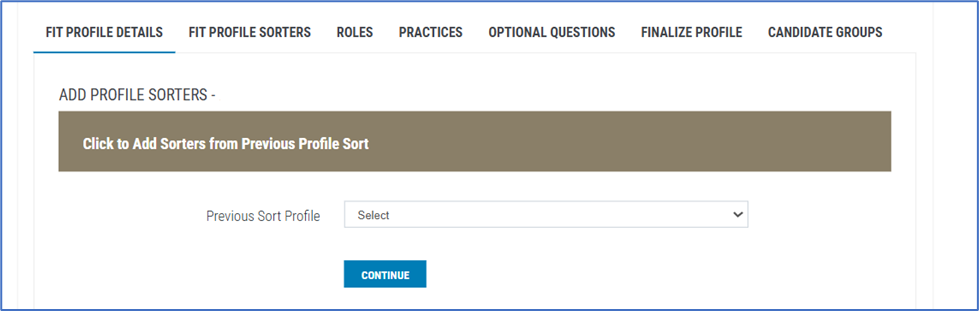
- Add Sorters from Previous Profile Sort – Reuse sorters from a prior profile. Select the profile from the dropdown and click Continue.
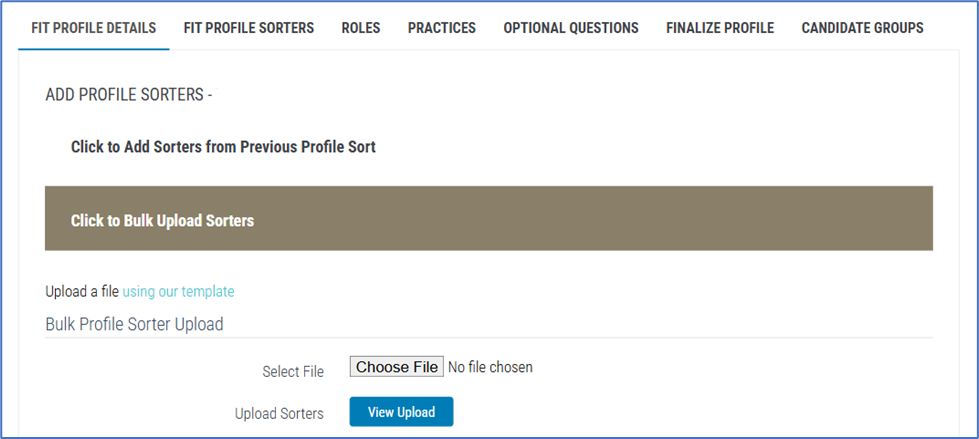
- Bulk Upload Sorters – Upload multiple sorters at once using the provided template, then click View Upload to confirm.
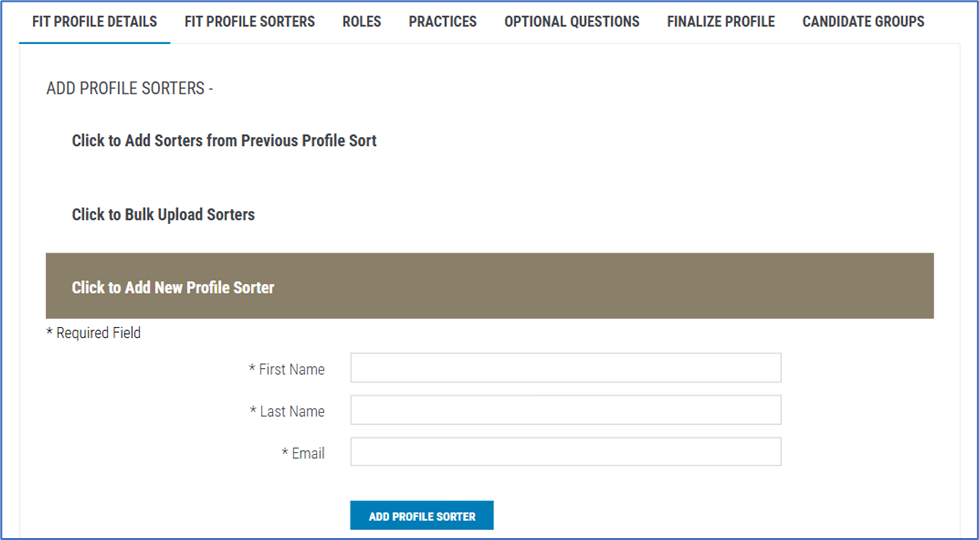
- Add New Profile Sorter – Enter first name, last name, and email manually, then click Add Profile Sorter.
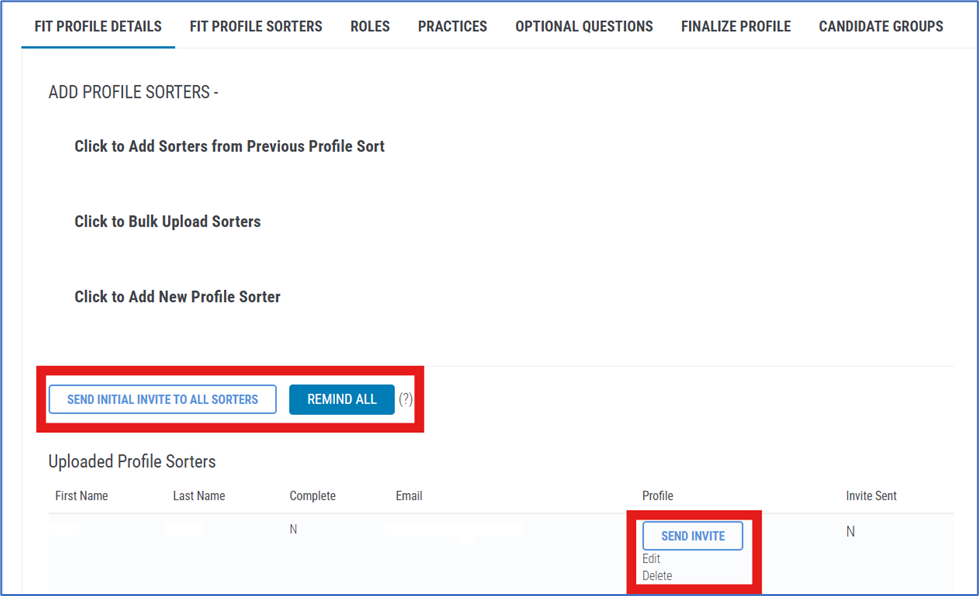
- Once added, sorters will appear in the Uploaded Profile Sorters list, showing their name, completion status, email, and whether an invitation has been sent.
- When at least one sorter has been added, the options to Send Initial Invite to All Sorters and Remind All will also appear.
- You can also manage individual sorters from the list with Edit and Delete options, or send invitations one by one.
Step 8: Roles #
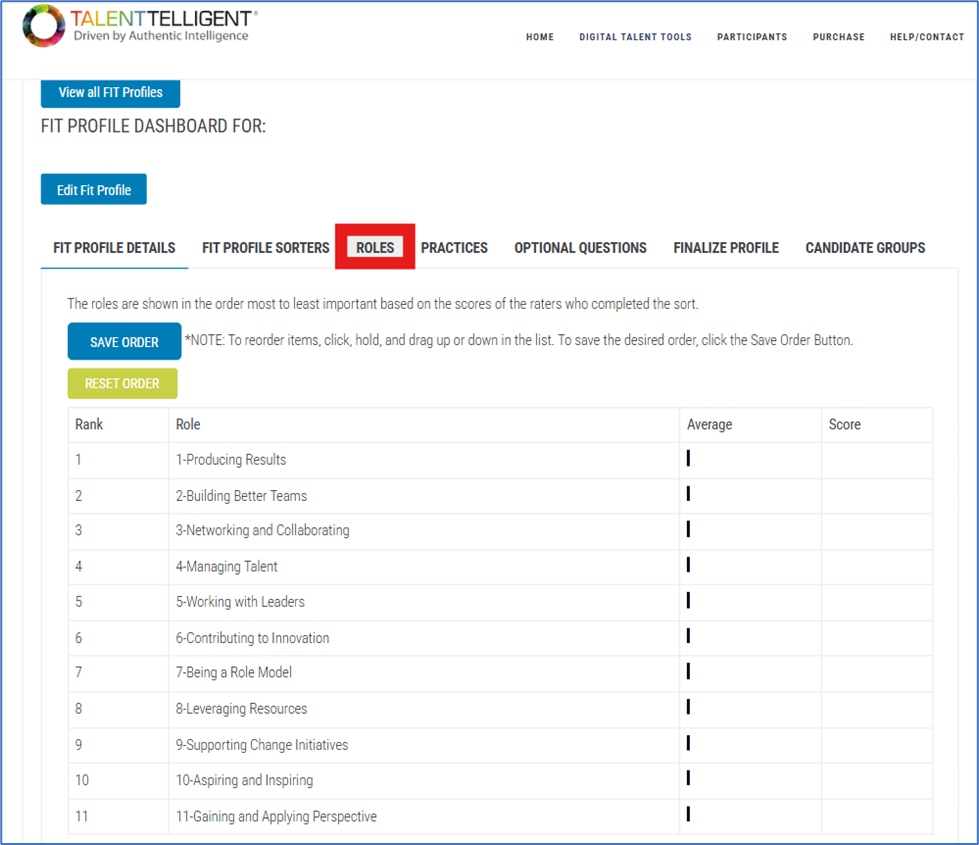
- The Roles tab lists all roles ranked from most to least important based on the scores of the raters who completed the sort.
- The set of roles displayed depends on the KSA Library you selected in Step 4:
- KSAL: Effective Leader – Roles emphasize vision, culture, and organizational leadership.
- KSAM: Effective Manager – Roles focus on producing results, building teams, and managing talent.
- KSAI: Individual Contributor – Roles highlight personal effectiveness, collaboration, and applying technical expertise.
- To change the order, click and hold a role, then drag it up or down in the list.
- Click Save Order to confirm your changes, or Reset Order to restore the default order.
Step 9: Practices #
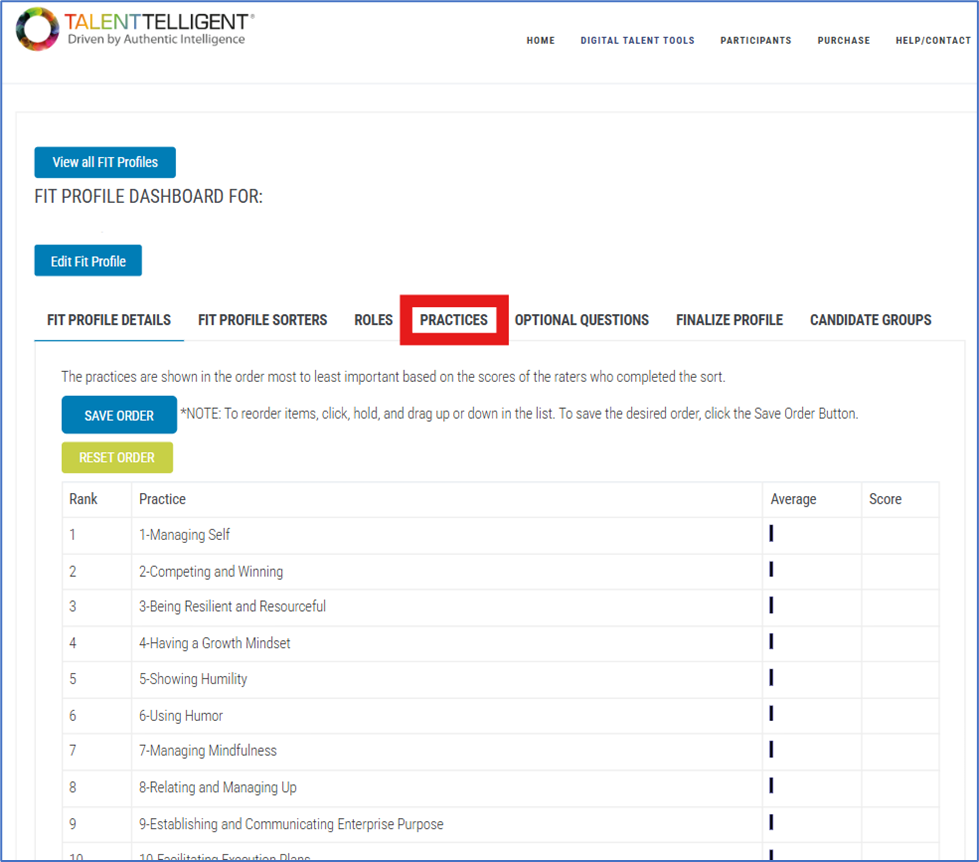
- The Practices tab lists all practices ranked from most to least important based on the scores of the raters who completed the sort.
- The set of practices displayed depends on the KSA Library you selected in Step 4:
- KSAL: Effective Leader – Practices emphasize self-management, achievement, resilience, and leading through change.
- KSAM: Effective Manager – Practices focus on managing self and others, resilience, execution, and organizational alignment.
- KSAI: Individual Contributor – Practices highlight personal effectiveness, resourcefulness, initiative, and problem-solving.
- To change the order, click and hold a practice, then drag it up or down in the list.
- Click Save Order to confirm your changes, or Reset Order to restore the default order.
Step 10: Optional Questions #
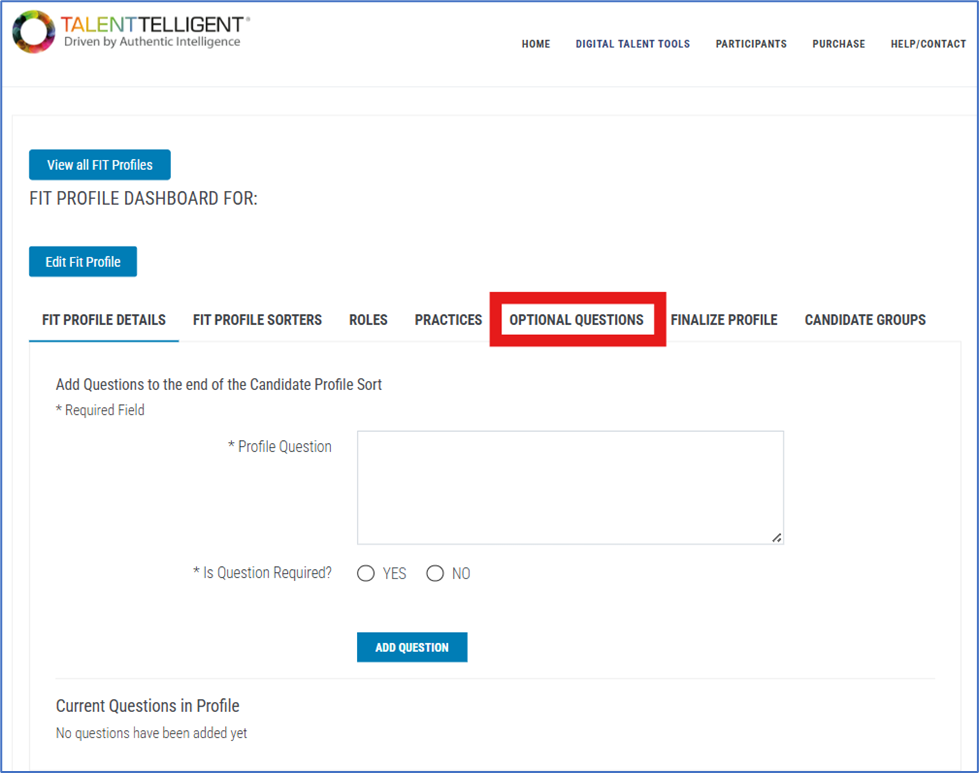
- Allows you to add custom questions for candidates.
- Type your question into the Profile Question field.
- Select Yes or No to make it required (if Yes is selected, the question will be marked as required in the list).
- Click Add Question.
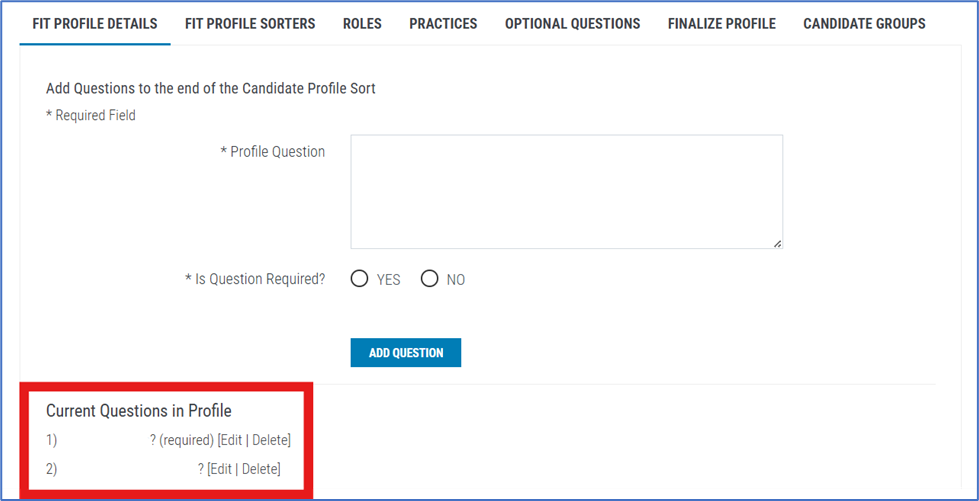
- Added questions will appear in the Current Questions in Profile list, where you will also have the option to Edit or Delete them if changes are needed.
Step 11: Finalize Profile #
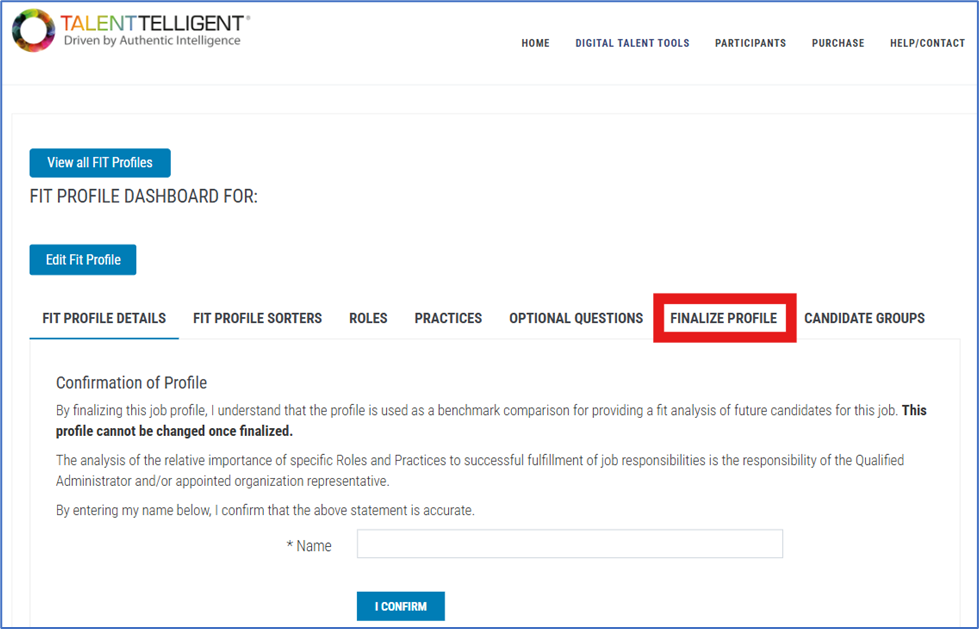
- Review the confirmation statement.
- Once finalized, the profile cannot be changed.
- To finalize:
- Enter your name in the confirmation field.
- Click I Confirm.
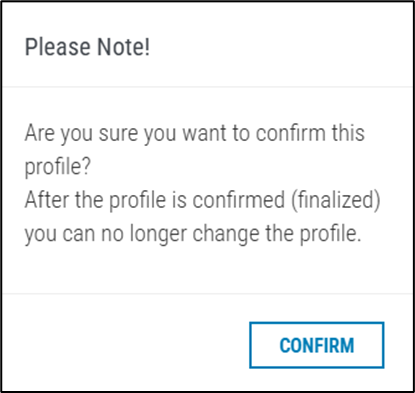
- After clicking I Confirm, a confirmation popup will appear.
- Once compelted, you will be taken back to the Fit Profile Details page, where the Number of Sorters will be displayed and will update dynamically as sorters are added and complete their tasks.
Step 12: Candidate Groups #
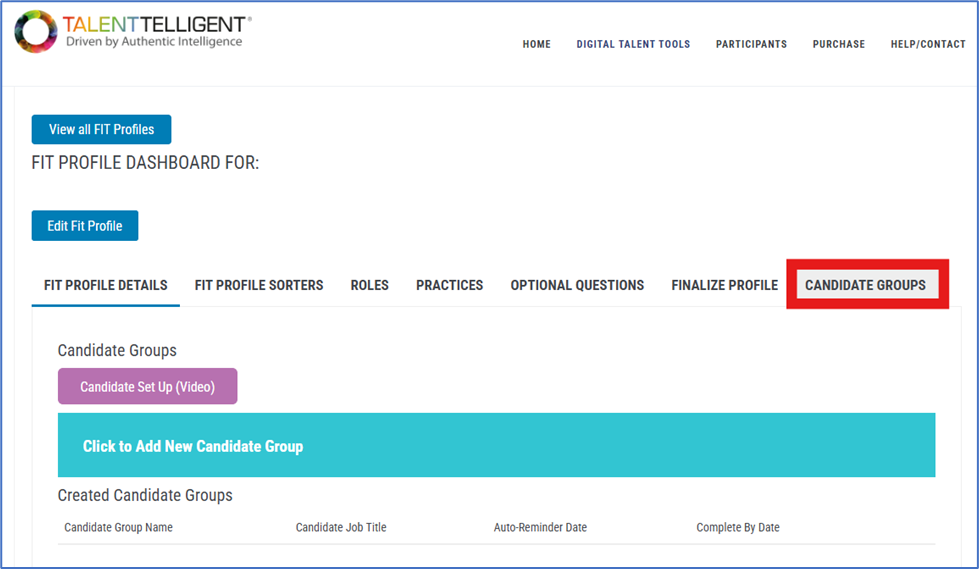
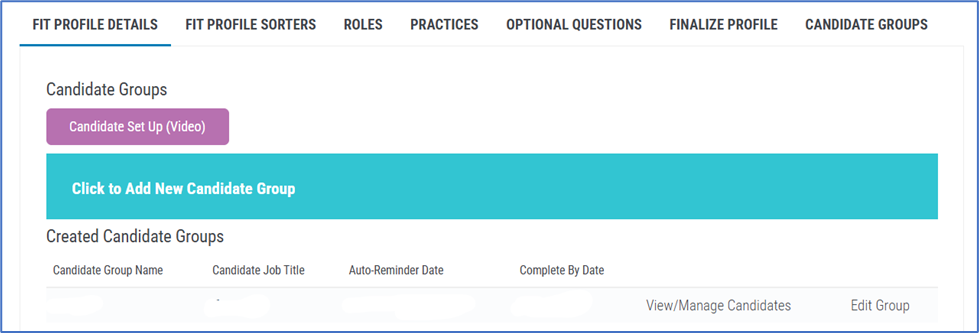
- Once the profile is finalized in Step 11, you can then click on the Candidate Groups tab.
- This tab allows you to create and manage groups of candidates who will be evaluated against the Fit Profile.
- A Candidate Set Up (Video) button is available at the top of this section for quick guidance if needed.
Step 13: Creating a New Candidate Group #
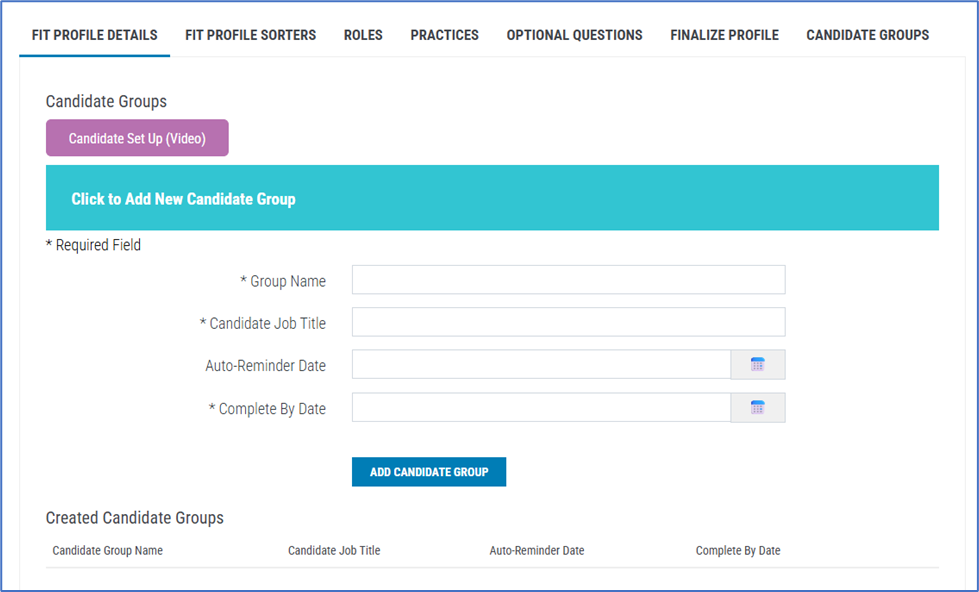
- Click Click to Add New Candidate Group.
- Complete the required fields:
- Group Name – a clear label to identify the candidate group.
- Candidate Job Title – pulled from the profile, can be edited if different wording is needed.
- Auto-Reminder Date – date the system will send follow-up emails to unfinished candidates.
- Complete By Date – final deadline for candidates to complete their assessment.
- Click Add Candidate Group to save.
Once created, the group appears in the Created Candidate Groups list. From there, you can:
- View/Manage Candidates assigned to the group.
- Edit Group to update details if necessary.
Step 14: Fit Candidate Group Dashboard #
- When you click View/Manage Candidates from the Created Candidate Groups list, you are taken to the Fit Candidate Group Dashboard, which has three sections on the taskbar:
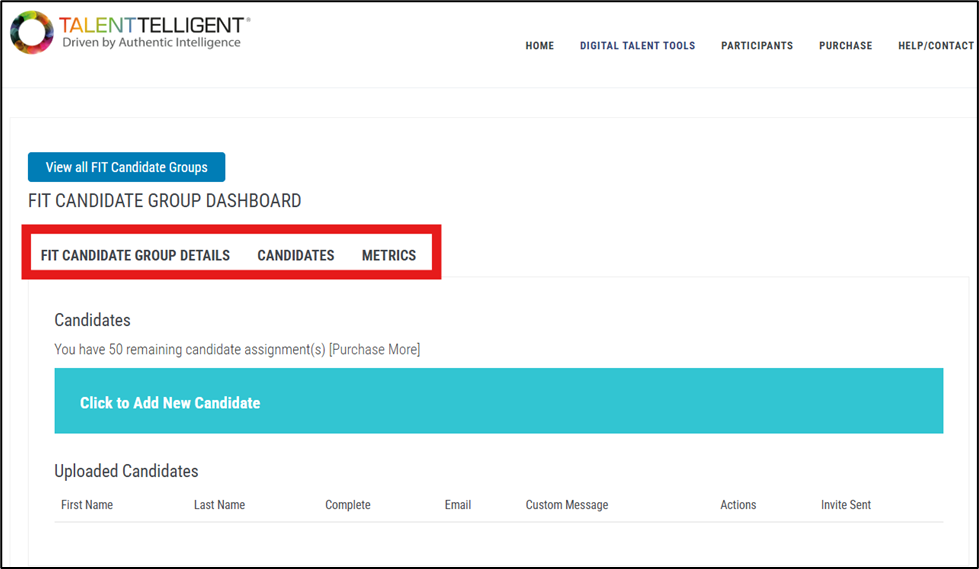
- Fit Candidate Group Details
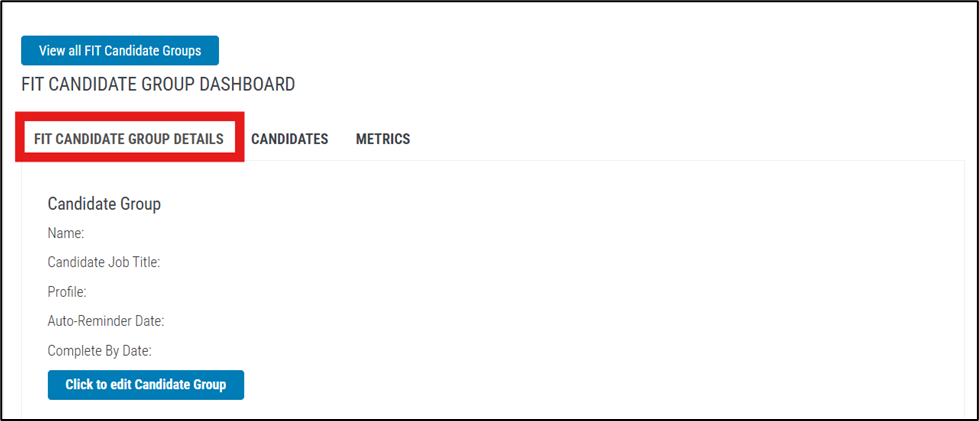
- Displays group information: Group Name, Candidate Job Title, associated Profile, Auto-Reminder Date, and the Complete By Date.
- To make changes, click Click to edit Candidate Group.
- Candidates
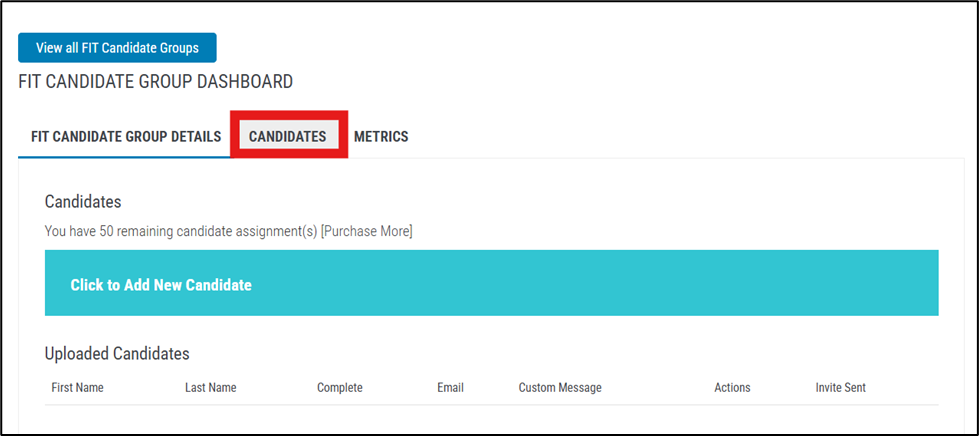
- This section is where you add and manage individuals to be evaluated.
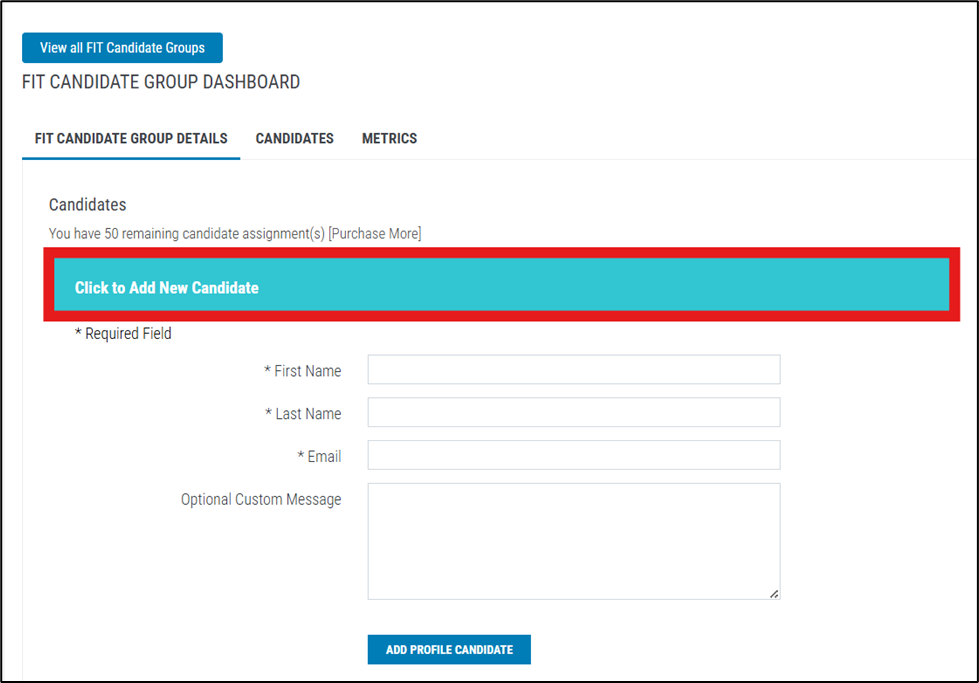
- To add a candidate, click Click to Add New Candidate, then complete the required fields (First Name, Last Name, Email, Optional Custom Message).
- Once saved, the candidate will appear in the Uploaded Candidates list, showing their name, completion status, email, custom message, and invitation status.
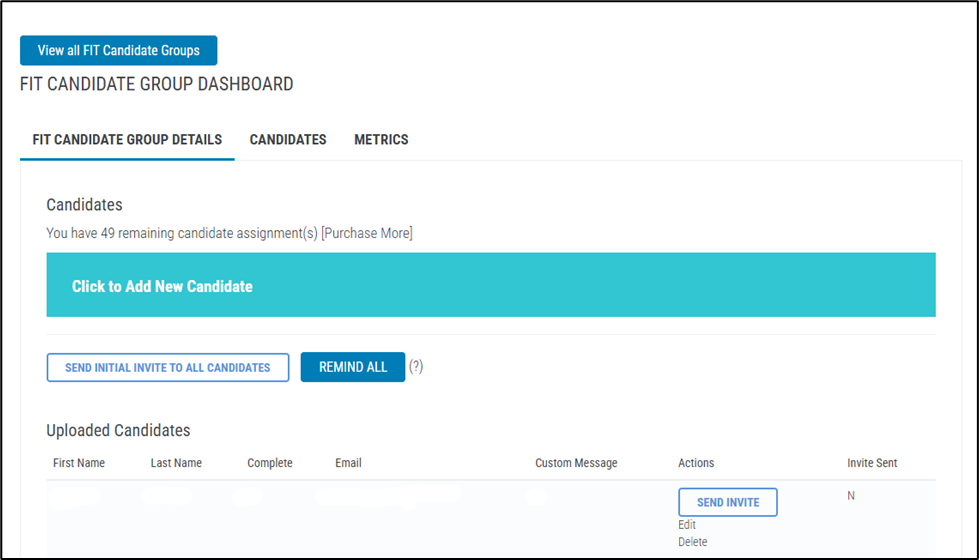
- Available Actions:
- Send Invite – sends the initial invitation to the candidate. The email includes their job title, instructions for completing the Virtual Card Sort, a secure link, a due date, a short preview video, support contact info, and a note that replies won’t be received.
- Send Initial Invite to All Candidates – sends the same email invitation to every candidate in the group at once.
- Remind All – sends a reminder email to all candidates who have not yet completed the process. The reminder repeats the original instructions and encourages prompt completion.
- Edit – update candidate details.
- Delete – remove a candidate from the group.
- Metrics
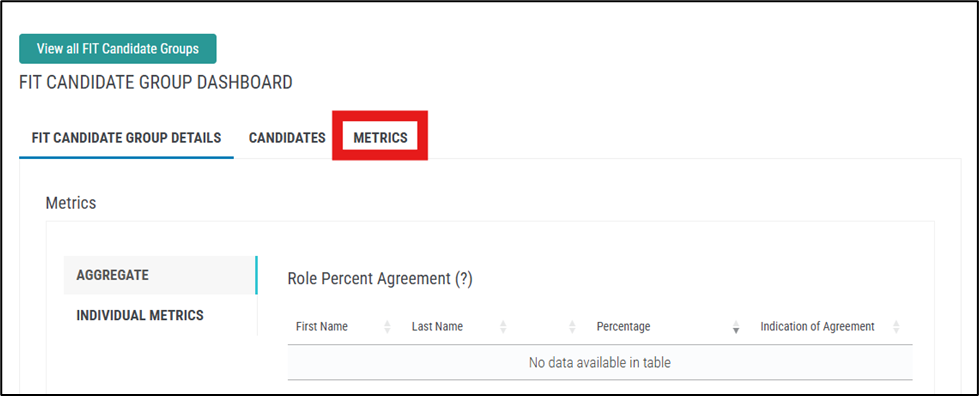
- The Metrics section is accessed from the taskbar and provides two views: Aggregate and Individual Metrics, navigated from the left-hand menu.
- Aggregate Metrics
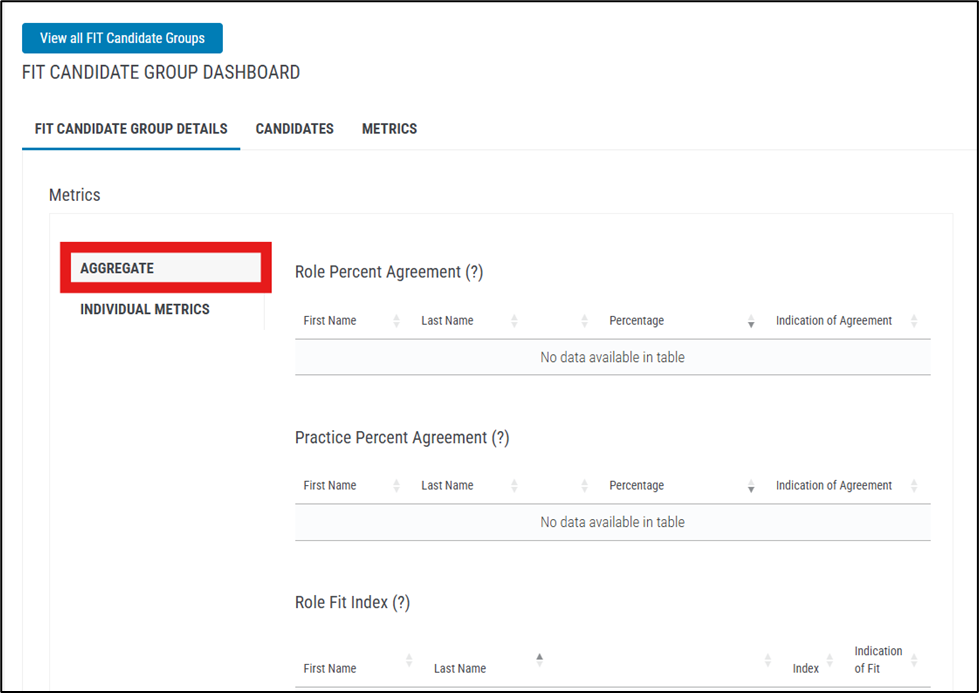
- Shows group-level results across all candidates, including:
- Role Percent Agreement – shows the percentage match between the candidate’s self-sort and the benchmark profile for roles. Higher percentages indicate stronger agreement.
- Practice Percent Agreement – measures how closely the candidate’s practice sort aligns with the benchmark profile. Higher values mean stronger alignment.
- Role Fit Index – reflects degree of fit on a 1–5 scale, based on how closely the candidate’s role sort matches the profile (5 = highest fit, 1 = lowest).
- Practice Fit Index – shows degree of fit on a 1–5 scale, based on candidate practice sort vs. profile practices (5 = highest fit, 1 = lowest).
- Difficulty Index – indicates how difficult it may be for the candidate to learn and execute the most important practices, scored 1–5 (5 = most difficult, 1 = least).
- Potential Index – measures capacity to take on more complex responsibilities, based on candidate practices. Scored 1–5 (5 = strongest potential).
- Team Contribution Index – evaluates alignment with team-oriented behaviors and contribution expectations. Scored 1–5 (5 = strongest contribution).
- Each table includes candidate details: First Name, Last Name, Percentage/Index score, and Indication of Agreement/Fit/Difficulty/Potential/Contribution.
- Shows group-level results across all candidates, including:
- Individual Metrics
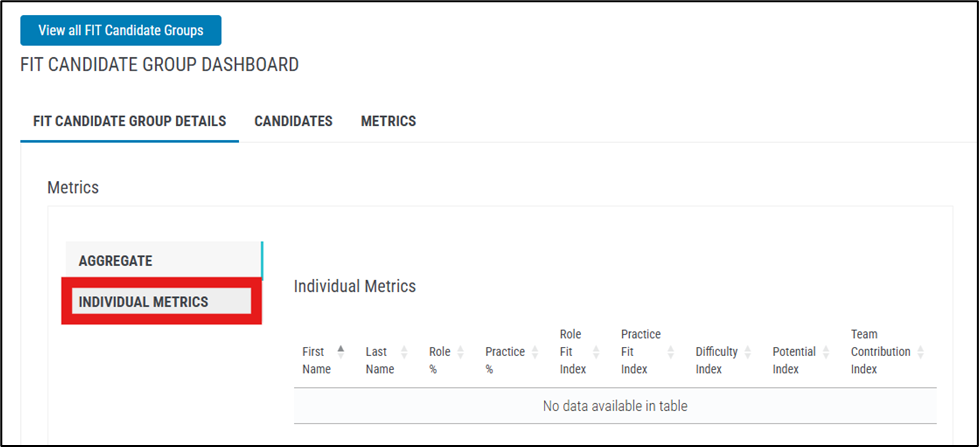
- Displays candidate-specific results – shows detailed scores for each individual separately.
- Indexes and percentages – lists the same measures as Aggregate Metrics (Role %, Practice %, Role Fit Index, Practice Fit Index, Difficulty Index, Potential Index, Team Contribution Index), but tied to one candidate at a time.
- Side-by-side comparison – allows you to evaluate how each candidate aligns to the Fit Profile individually, making it easier to compare multiple candidates in the group.
Step 15: Candidate Completion and Metrics Display #
- Once a candidate completes their Virtual Sorting exercise, their results will automatically generate within the Fit Candidate Group Dashboard.
- Under the Candidates tab, a Print Candidate Report option will become available for each completed individual. This allows administrators to review and save detailed results for record-keeping or evaluation.
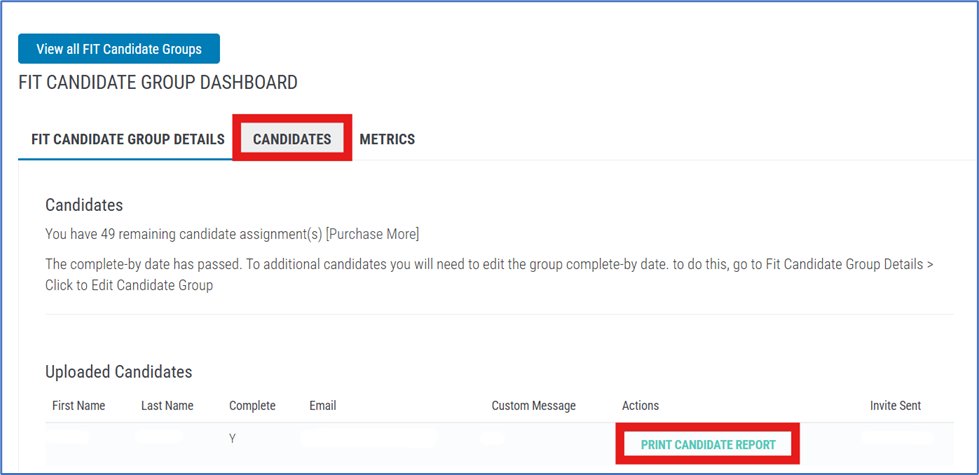
- At the same time, the Metrics tab will begin to populate with results. Both Aggregate Metrics and Individual Metrics will be available:
- Aggregate Metrics display group-level results, including Role Percent Agreement, Practice Percent Agreement, and index scores with agreement indicators.
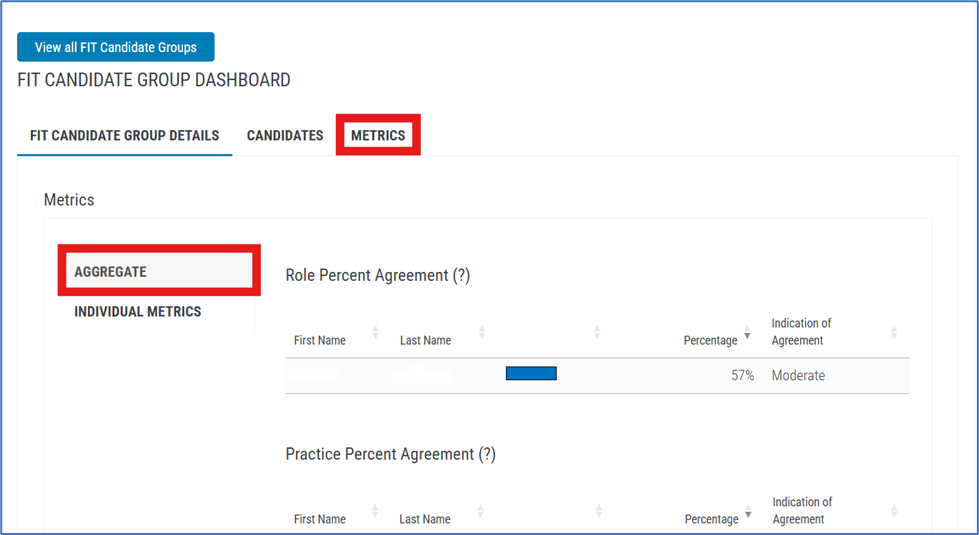
- Individual Metrics provide a candidate-by-candidate breakdown, showing Role %, Practice %, Role Fit Index, Practice Fit Index, Difficulty Index, Potential Index, and Team Contribution Index.
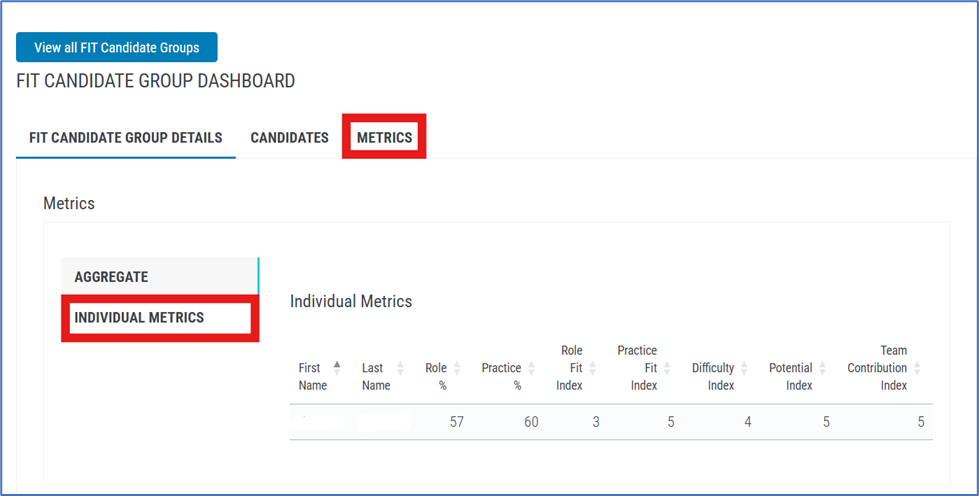
- Aggregate Metrics display group-level results, including Role Percent Agreement, Practice Percent Agreement, and index scores with agreement indicators.
- These results ensure that administrators can directly compare candidates against the Fit Profile and make evidence-based hiring decisions.
Conclusion #
The Hello! Fit Appraisal provides your organization with the tools to run structured, fair, and evidence-based hiring processes. By creating and finalizing Fit Profiles, managing candidate groups, and analyzing candidate metrics, you ensure that every hire is evaluated consistently.
With clear steps for building, managing, and finalizing profiles, the process supports both hiring teams and candidates, promoting professionalism and confidence at every stage. By following this documentation, your teams can deliver a consistent, branded hiring experience that reduces bias and strengthens decision-making.