- Introduction
- Step 1: Navigate to the DIY Digital Tool
- Step 2: Create a New Digital DIY
- Step 3: Complete the Develop-It-Yourself Digital Setup Form
- Step 4: Select Roles / Practices
- Step 5: Add/Edit Develop-It-Yourself Digital Learners
- Step 6: Learner Experience and Dashboard Overview
- Step 7: Utilization Dashboard
- Conclusion
Introduction #
This documentation provides step-by-step guidance for setting up and managing the Develop-It-Yourself (DIY) Digital tool. It explains how to create and customize digital learning experiences, invite learners, and review engagement activity.
The DIY Digital platform features an AI-enabled dashboard where learners explore selected Roles and Practices through interactive, self-directed development. All activity takes place within the dashboard, and no file downloads or submissions are required.
Step 1: Navigate to the DIY Digital Tool #
- From the Qualified Administrator Home, go to Digital Talent Tools → Develop-It-Yourself Digital.
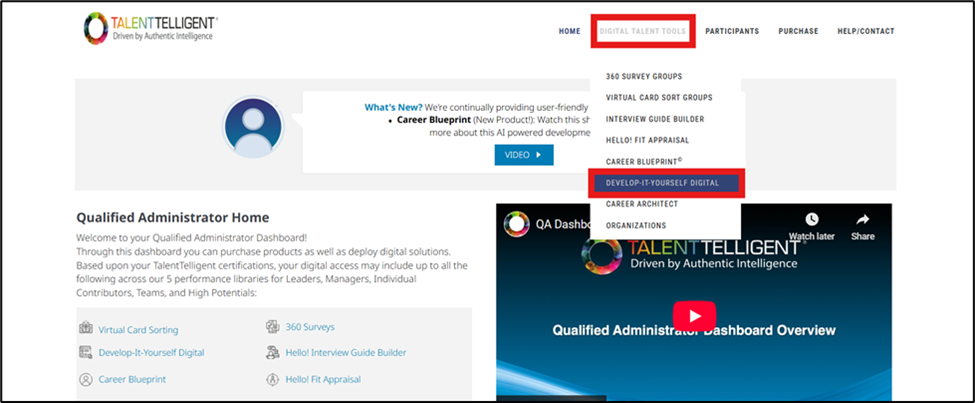
- This opens the View Digital DIYs page.
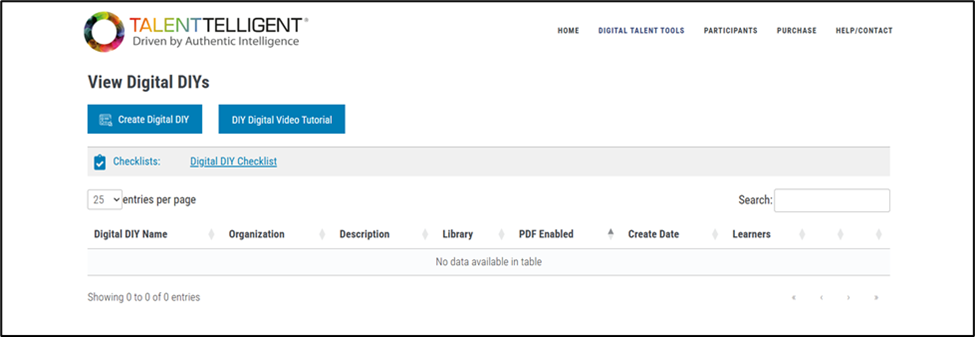
- Available actions on this page include:
- Create Digital DIY – start a new learning experience.
- DIY Digital Video Tutorial – a helpful video that walks through how to create and manage a DIY Digital guide.
- Digital DIY Checklist – quick reference of setup steps. Some items, such as PDF generation, are no longer applicable.
- Once created, DIYs will appear in the table with details such as Digital DIY Name, Organization, Description, Library, PDF Enabled, Create Date, and Learners.
- Use the Search box or adjust entries per page to locate and manage DIYs efficiently.
Step 2: Create a New Digital DIY #
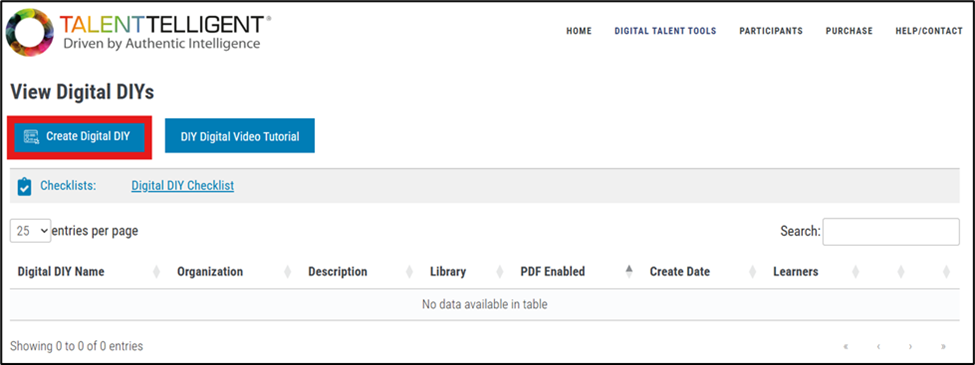
- On the View Digital DIYs page, click Create Digital DIY.
- This opens the Create Develop-It-Yourself Digital setup page, where you will enter the basic information for your new Digital DIY.
- A progress bar at the top of the screen outlines the four setup stages:

- Create Develop-It-Yourself Digital
- Select Library/Roles/Practices
- Manage Develop-It-Yourself Digital Learners
- Utilization Dashboard
Step 3: Complete the Develop-It-Yourself Digital Setup Form #
After selecting Create Digital DIY in Step 2, you will be directed to the setup form where you’ll enter the required details to configure your new Digital DIY.
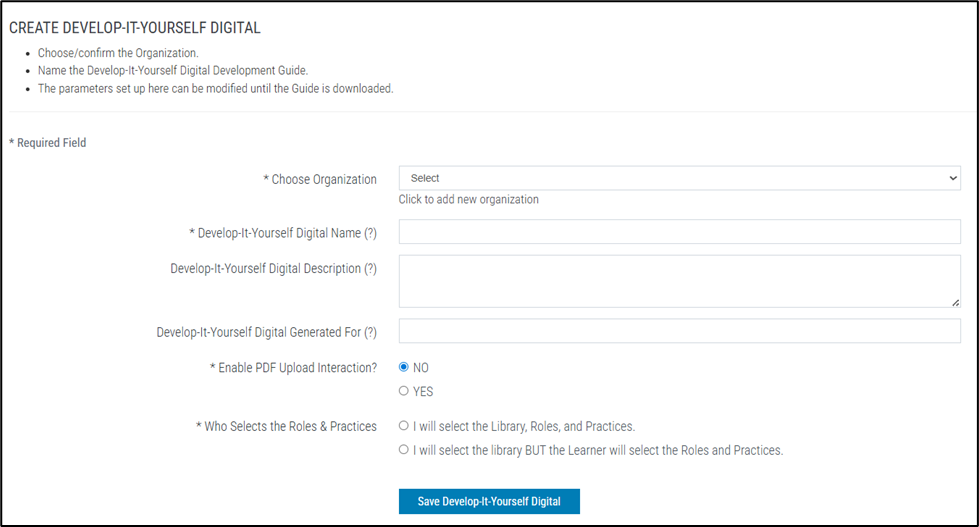
- Choose Organization – Select your organization from the dropdown list.
- If your organization is not listed, click Click to add new organization to create it, then select it.
- Develop-It-Yourself Digital Name (*) – Enter a name for your Digital DIY.
- This name appears on the welcome screen that greets learners in the Develop-It-Yourself Digital portal.
- Develop-It-Yourself Digital Description (Optional) – Provide a short internal description of this Digital DIY.
- This information is visible only to administrators and will not appear to learners.
- Use this section to record context or purpose for future reference.
- Develop-It-Yourself Digital Generated For (Optional) – Identify who this Digital DIY is being created for.
- Examples: a specific learner, team, department, or program.
- Enable PDF Upload Interaction (*) – Controls whether learners can upload files within their DIY dashboard.
- No: The Uploaded Assessments section will be hidden in the learner view.
- Yes: Learners can upload up to three assessment PDFs. These uploads become part of the AI’s contextual data within Your Career Architect, allowing it to tailor responses and development suggestions based on the uploaded materials.
- Who Selects the Roles & Practices (*) – Determines how Roles and Practices are assigned:
- I will select the Library, Roles, and Practices – The administrator pre-selects all content for learners. This ensures consistency across users.
- I will select the Library BUT the Learner will select the Roles and Practices – The administrator selects only the KSA Library, and learners choose their own Roles and Practices after logging in.
- When this option is chosen, an additional field appears to select a KSA Library:
- KSA – Leaders – For leadership roles requiring decision-making, strategy, and leading others.
- KSA – Managers – For managerial roles focused on supervising teams and daily operations.
- KSA – Individual Contributors – For roles centered on independent, specialized contributions without direct management.
- In this setup, the Select Roles / Practices step is skipped for the administrator, and learners complete their selections upon logging in (see Step 6).
- When this option is chosen, an additional field appears to select a KSA Library:
Important: For the purpose of this documentation, the “I will select the Library, Roles, and Practices” path is used to demonstrate the full administrator setup process for QA review.
When all fields are complete, click Save Develop-It-Yourself Digital to continue. This saves your setup and moves you to the next step.
Step 4: Select Roles / Practices #
After saving your setup, you will move to the Select Roles / Practices page. This is where you choose which Roles and Practices will appear in your Develop-It-Yourself Digital dashboard.
- A taskbar appears just below the Clear Selected Library button.
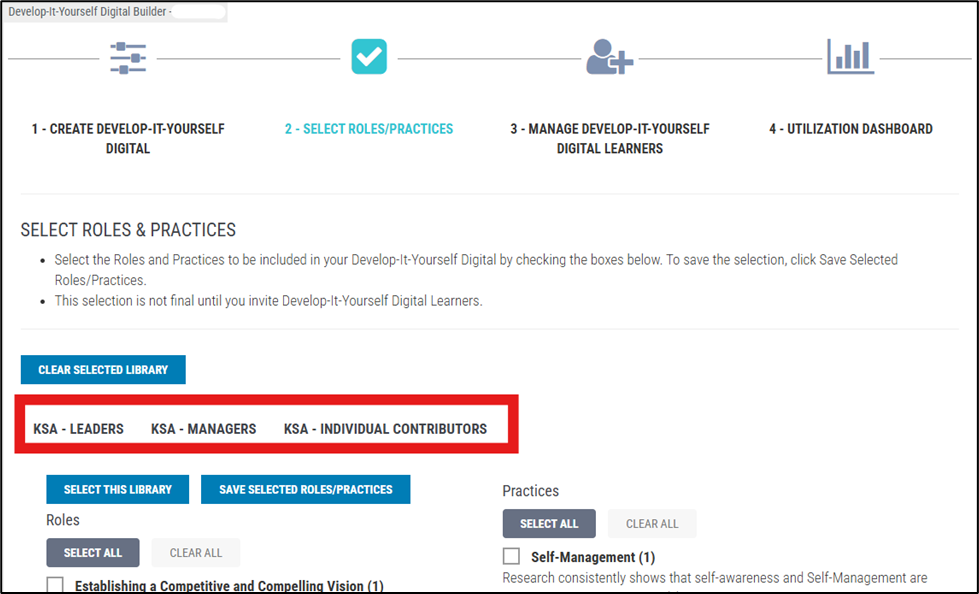 This taskbar allows you to switch between the three available KSA libraries:
- KSA – Leaders
- KSA – Managers
- KSA – Individual Contributors
- Each library displays Roles on the left side and Practices on the right.
- Before making any selections, click Select This Library to activate the list. Once activated, check the boxes next to each Role and Practice you want to include.
- To change libraries, click Clear Selected Library, then choose a different option from the taskbar.
- When finished, click Save Selected Roles / Practices to confirm your selections and move to the next step.
Learners who select their own Roles and Practices will complete this step themselves the first time they log in to their Digital DIY.
Step 5: Add/Edit Develop-It-Yourself Digital Learners #
In this step, you will add the individuals who will participate in your Digital DIY learning experience.
At this point, the interface updates slightly, and the first two setup stages (Create/Edit Develop-It-Yourself Digital) now appear as a single combined button in the progress bar, indicating that setup and library selection are complete.

You can add learners in two ways:
- Bulk Upload Develop-It-Yourself Digital Learners Using a File – Upload a CSV file containing learners’ names and email addresses.
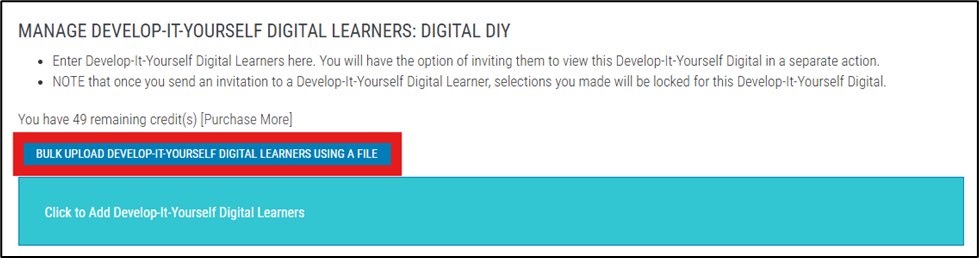
- Click to Add Develop-It-Yourself Digital Learners – Add learners manually by entering their first name, last name, and email address, then click Save. You may also include an optional Custom Message that appears in each learner’s invitation email.
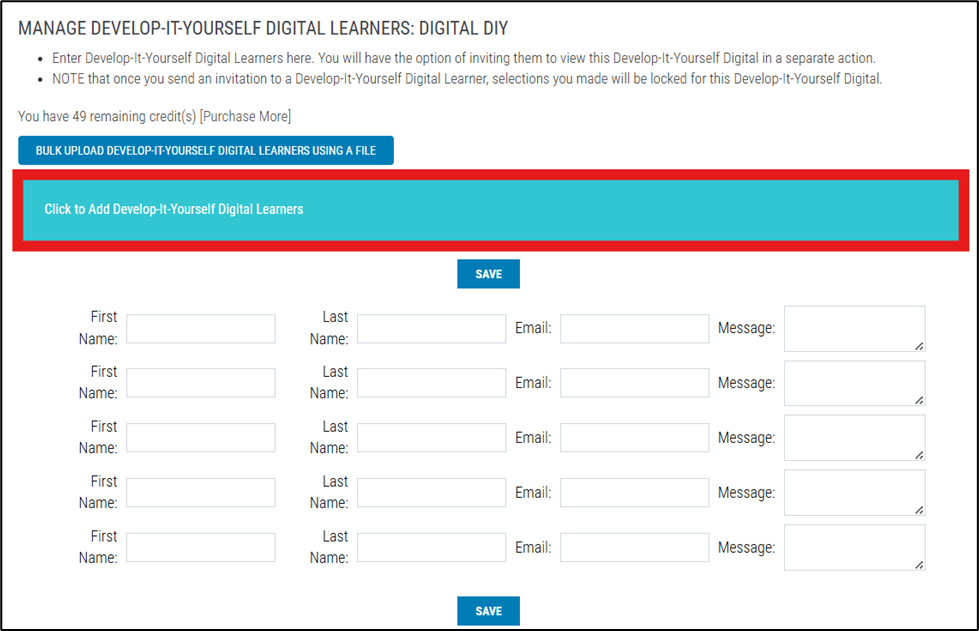
Once a learners are added and invitations are sent, the table at the bottom of the page displays key information, including:
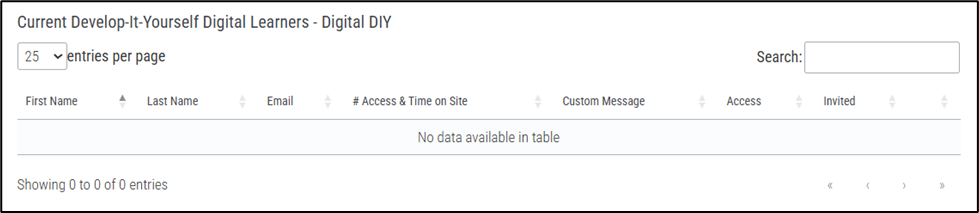
- First Name, Last Name, and Email Address
- # Access & Time on Site – tracks how long each learner has spent in their DIY Digital
- Custom Message – shows any personalized note included with their invitation
- Access and Invited statuses – indicate whether the learner has received and opened their invitation
Invitations can be sent in two ways:
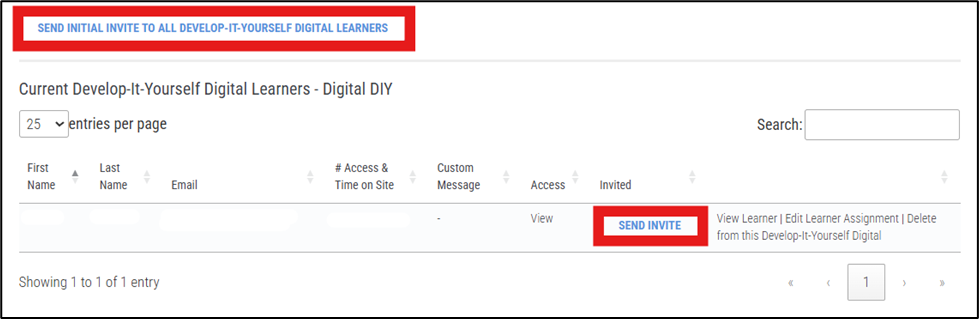
- Click Send Initial Invite to All Develop-It-Yourself Digital Learners to invite everyone at once.
- Click Send Invite next to an individual learner’s name to send their invitation.
After invitations are sent, the # Access & Time on Site column updates automatically as learners begin using their Digital DIY. It displays their total logins and time spent, offering an early view of engagement before full reporting becomes available in the Utilization Dashboard.
Step 6: Learner Experience and Dashboard Overview #
Once learners receive their invitations, they will get an email titled “You have been provided access to the Digital DIY!” from TalentTelligent. The message includes:
- A short login link to the Digital DIY site
- Their username (email address) and temporary password
- Contact details for TalentTelligent Support and the organization’s Administrator
Learners use these credentials to sign in and begin their Digital DIY experience.
- Most learners will go directly to the Roles and Practices selection page after logging in, where they choose the areas most relevant to their development. This occurs when the administrator selected the option “I will select the Library BUT the Learner will select the Roles and Practices” in Step 3.
- The page displays Roles on the left and Practices on the right, each with descriptions and options to Select All, Clear All, and Save Roles & Practices.
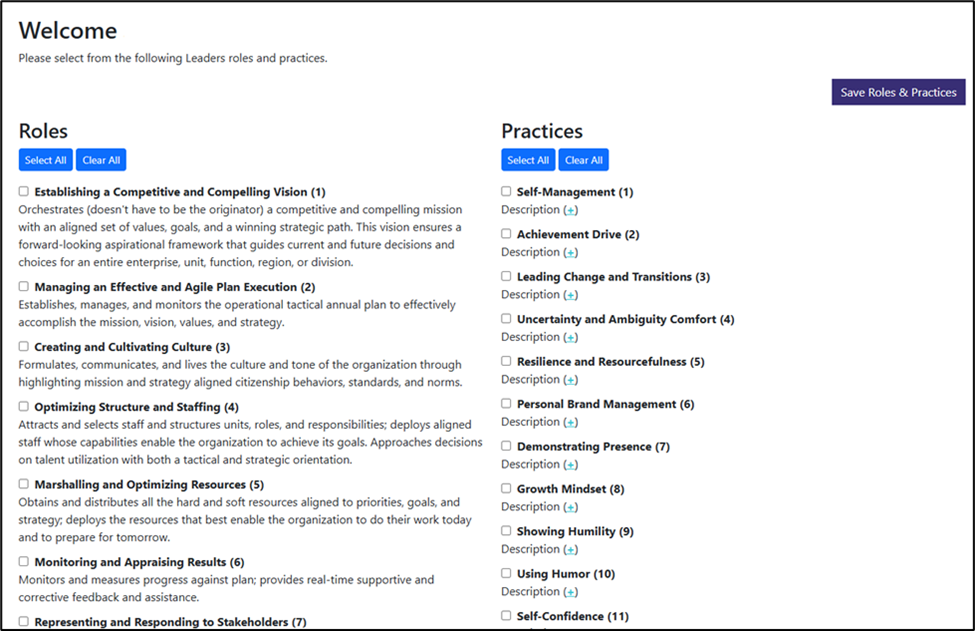
- The page displays Roles on the left and Practices on the right, each with descriptions and options to Select All, Clear All, and Save Roles & Practices.
- After learners select their Roles and Practices, they are automatically directed to their personalized Digital DIY Dashboard, which displays their chosen content and provides access to Your Career Architect.
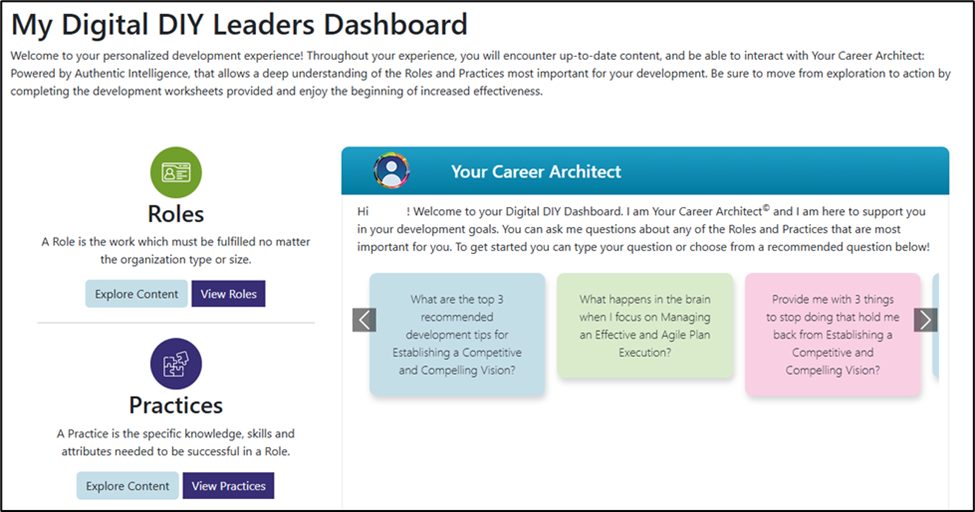
- If the administrator pre-selected the Roles and Practices in Step 4, learners will go straight to their Digital DIY Dashboard after logging in.
- On future logins, learners will go directly to their Digital DIY Dashboard.
- Learners with multiple AI tool assignments (for example, access to both Digital DIY and Career Architect) will first see a Product Selection Page prompting them to select which tool they want to open. Most users will not see this page.
Inside the Digital DIY Dashboard #
The dashboard provides an interactive learning environment built around the selected Roles and Practices, supported by AI-driven development tools.
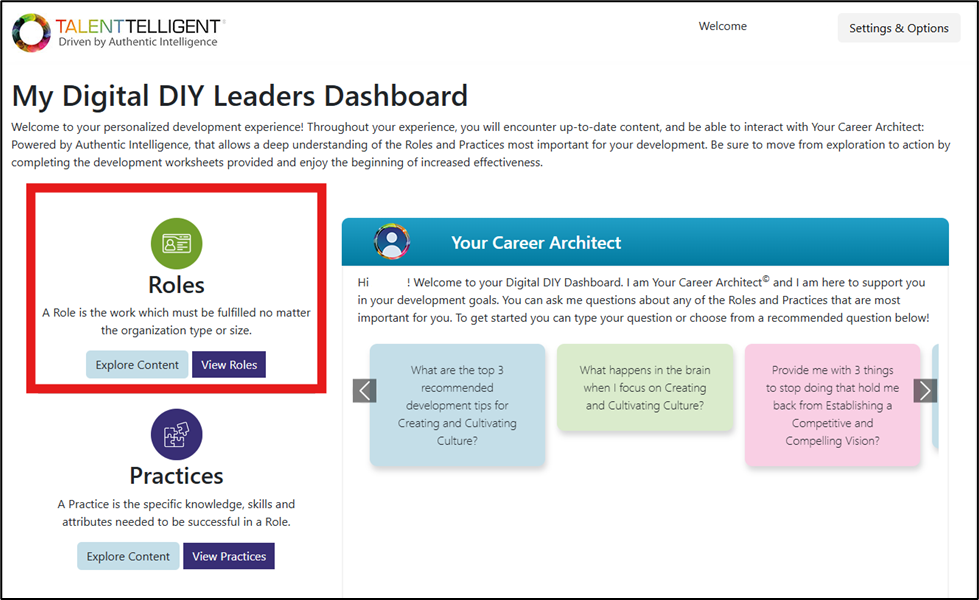
- Roles Section
- Displays key responsibilities that must be fulfilled within the organization, regardless of size or type.
- Learners can click Explore Content or View Roles to review descriptions, expectations, and recommended development actions.
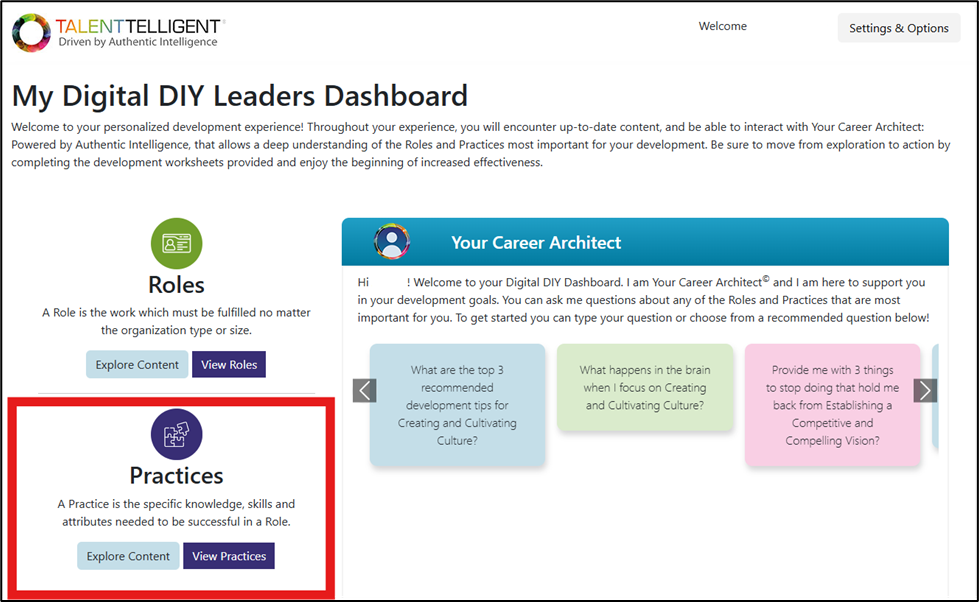
- Practices Section
- Highlights the knowledge, skills, and attributes needed to perform effectively within a role.
- Learners can click Explore Content or View Practices to explore development tips aligned with their goals.
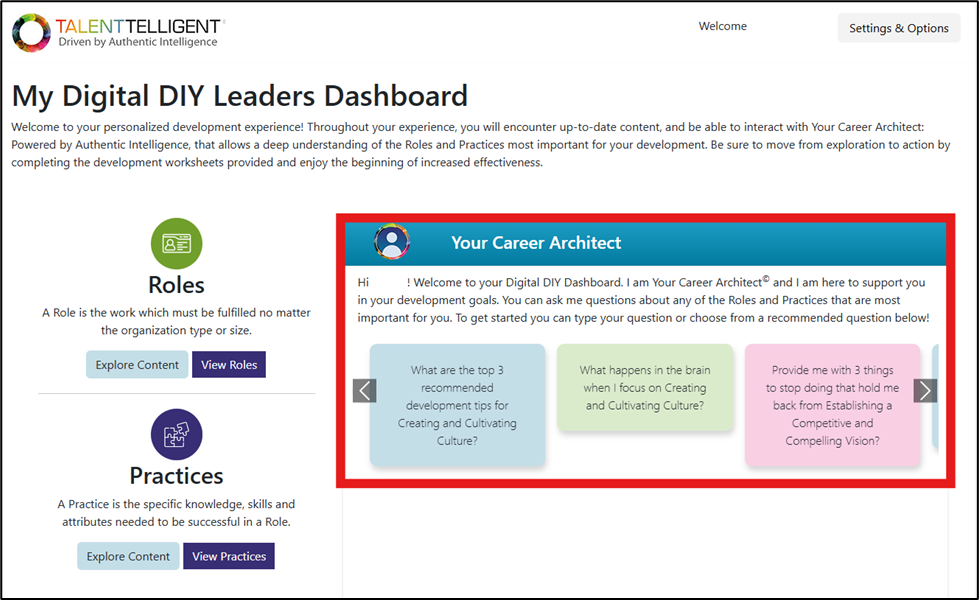
- Your Career Architect Panel
- Provides AI-powered support to guide the learner’s development journey.
- Learners can type questions or choose from suggested prompts, such as recommended development tips, brain insights, or career-related guidance.
- This interactive panel personalizes the learning experience and encourages exploration of relevant Roles and Practices.
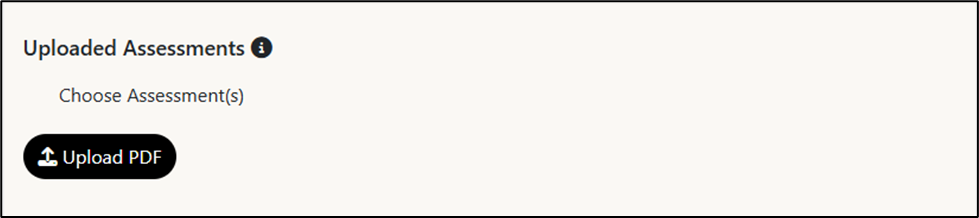
- Uploaded Assessments (if enabled)
- If PDF Upload Interaction is enabled, an Uploaded Assessments section appears below the panel.
- Learners can upload up to three assessment PDFs for reference or review by the Career Architect.
- Each file can be toggled on or off to include or exclude it from AI interactions.
- When disabled, this section is hidden from the learner’s dashboard.
- Background Section
- Appears below the uploaded assessments area and provides quick-access learning resources.
- Includes links such as Why Do Levels Matter?, Deep Dive Development Plans, and What is Developmental Difficulty? to help learners deepen understanding of key development concepts.

- Progress and Engagement
- Learner activity such as time on site and sign-ons is tracked automatically. This data appears in the Utilization Dashboard in Step 7.
Step 7: Utilization Dashboard #
The Utilization Dashboard allows administrators to monitor learner engagement and activity within the Digital DIY. Rather than serving as a completion tracker, it provides insight into how learners interact with their content, showing participation levels, time on site, and selected development areas. The dashboard is divided into three main sections that help administrators assess engagement across individuals and teams.
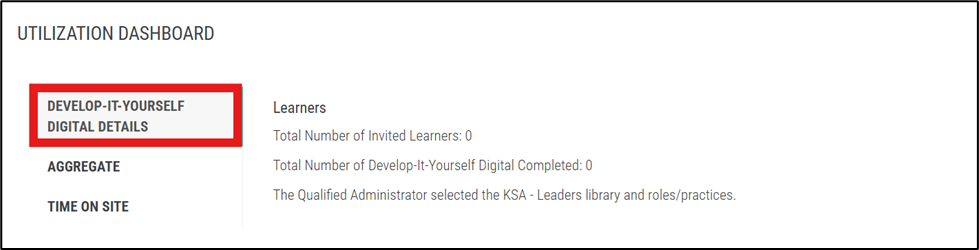
- Develop-It-Yourself Digital Details – This section provides a summary of learner participation.
- Displays the total number of invited learners and the number who have accessed their Digital DIY.
- Lists the KSA Library that was selected (Leaders, Managers, or Individual Contributors).
- Confirms whether roles and practices were chosen by the administrator or by the learner.
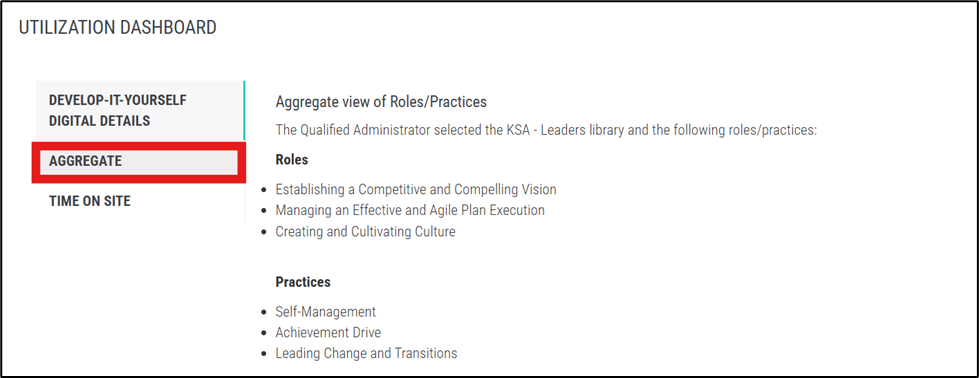
- Aggregate – The Aggregate tab summarizes all selected Roles and Practices within the chosen KSA Library.
- Shows which Roles and Practices are currently in use.
- Helps identify development focus areas or trends across learners and teams.
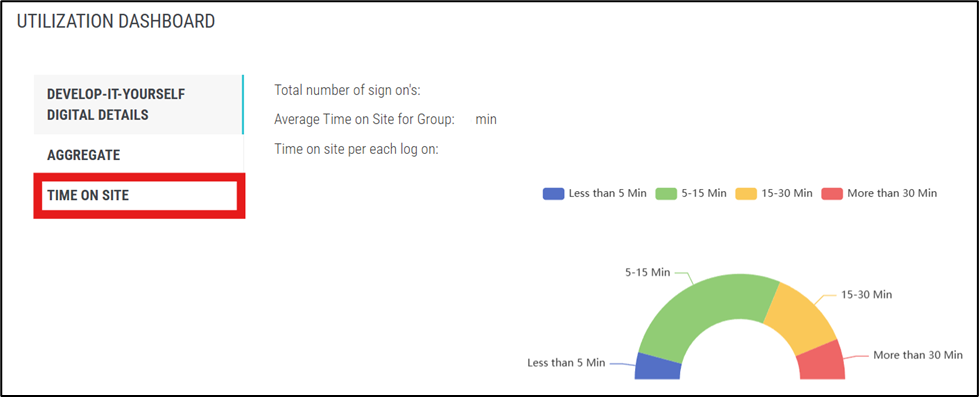
- Time on Site – The Time on Site section provides engagement data and usage duration.
- Displays the total number of sign-ons and the average time spent on site.
- Includes a color-coded chart showing the percentage of users who spent:
- Less than 5 minutes
- 5-15 minutes
- 15-30 minutes
- More than 30 minutes
Conclusion #
The Develop-It-Yourself (DIY) Digital tool brings together every part of the development process, from setup and learner invitations to ongoing engagement tracking. Administrators can create and manage personalized learning experiences, while learners explore customized Roles and Practices that support their professional growth.
The Utilization Dashboard completes the process by providing visibility into learner activity and participation, allowing administrators to make informed decisions and maintain alignment with organizational goals. Together, these features create a seamless, interactive approach to continuous development across individuals and teams.