
Introduction #
The R.A.N.D. Career Profile Survey is where Science Meets Potential. This survey is completed by the manager(s) of those considered to have high potential. Managers assess employees against observable behaviors in a user-friendly experience. Results are provided to the talent leader for analysis and insights that drive succession planning, career assignments, and developmental prioritizations, to name a few.
This guide provides comprehensive, step-by-step instructions for setting up and managing the R.A.N.D. Career Profile Survey within TalentTelligent’s Digital Talent Tools platform. It explains how Qualified Administrators (QAs) create Survey Groups, add participants (Candidates and Raters), and access R.A.N.D. Reports.
Administrator Responsibilities #
As the Qualified Administrator, you are responsible for selecting:
- The R.A.N.D. library
- The type of Survey (Ratings or Sort)
- All participant management, including Candidates and Raters
Key considerations when using the Digital Talent Tools platform:
- Candidates and Raters may be added individually or via file upload.
- You control when Survey invitations and reminders are sent (and may send them in stages).
- Reports are accessed through the Manage Learners & Reports area.
- Note: It is possible to copy between a R.A.N.D. KSAP Career Profile and KSAP Career Development.
Step 1: Create a R.A.N.D. Survey #
Menu Path: Digital Talent Tools → R.A.N.D. Survey Groups
Create R.A.N.D. Survey Group #
Menu Path: Digital Talent Tools → R.A.N.D. Survey Groups → Create R.A.N.D. Survey Group
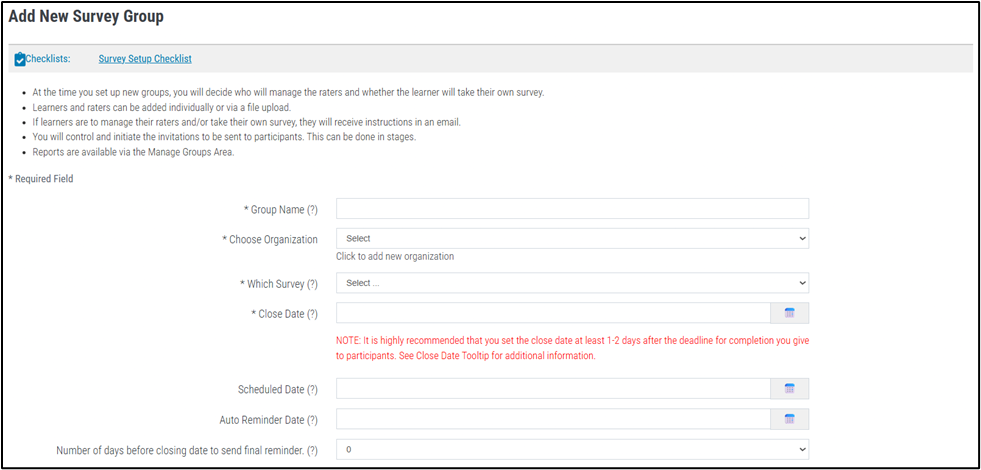
The following mandatory options must be selected:
- *Group Name – Choose a name meaningful to the process.
- *Choose Organization – Select any organization previously created under your profile.
- *Which Survey – Specify whether the Survey is a Sort or Ratings Survey.
Sort Surveys #
Participants sort cards into Sorting Piles.
If selecting a Sort Survey:
- *Sorting Columns (3 or 5) – Number of available Piles.
- *Sorting Type (Absolute)
Absolute Sort (any number of Practices in any Pile):
- Participants may place any number of Practices in any Pile.
- Example: One Pile may contain 5 Practices, another 3, another 1.
Ratings Surveys #
Participants respond using radio buttons.
- The R.A.N.D. Career Profile Surveys also include the option to add three framing questions using the Include 3 framing questions? radio button. These questions are related to:
- Career Mobility
- Culture Alignment
- Leadership Style Alignment
- *Close Date – The final date participants may access the Survey. This date can be edited before or after the survey closes.
- The default view of groups is open groups. To see the closed groups, use the dropdown to select ‘All’ or ‘Closed’.
- After this date:
- No new participants may be added
- Participants cannot complete the Survey
- The Close Date can be edited to re-open a survey.
- Important: The Close Date also governs reminders and system-controlled actions. Timing varies by time zone. For more information about the Close Date, click here.
Archived Groups
- If you want to remove groups from display in the View Groups Grid altogether, you can move them to Archived Groups.
- The purpose of the archival option is to remove older closed groups from the main Group view. Doing this will speed up the use of the unarchived groups.
- None of the Learner/Rater/Report data associated with an archived group is deleted.
- You can Archive closed survey groups by selecting ‘Manage Archived Groups’ button.
- Check the box beside the group(s) you want to archive. Save.
- To access an archived group, return to this page and uncheck the box and click Save Changes.
In addition to the mandatory options, you are provided with the following non-required options:
- Scheduled Date – Date Survey invitations will be sent automatically (delivered at 5:30 AM ET).
- Auto-reminder Date – Sends an automatic reminder to all non-completed Raters on the selected date.
- Final Reminder Timing – Specify a number of days before the Close Date to send one additional automatic reminder.
- *Can Learner Add Raters (Y/N)
- Determines whether Learners may enter their own Raters.
- Not available for R.A.N.D. Career Profile Surveys.
- *Can Learner Take Survey (Y/N)
- Indicates whether the Learner may complete a self-Survey.
- Not available for R.A.N.D. Career Profile Surveys.
- Optional Custom Email Message
- A custom message may be added to invitations, reminders, and re-sent emails.
- These messages can be edited at any time.
Completing the Group Setup #
Once all required information has been entered:
- Click Add Group.
- Click Continue and Save.
After saving, all Group management can be completed via the View R.A.N.D. Survey Groups grid:
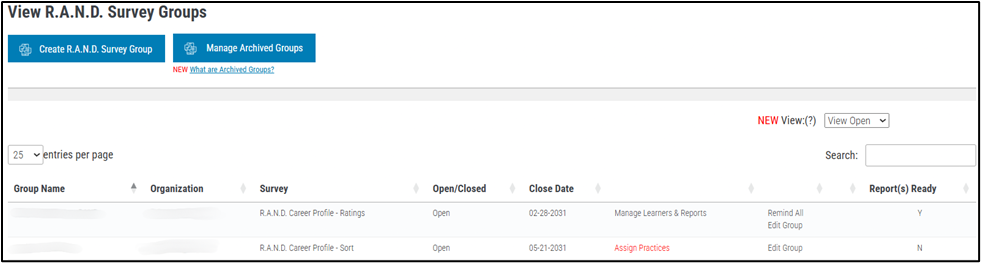
Menu Path: Digital Talent Tools → R.A.N.D. Survey Groups
Step 3: Assign Practices #
Menu Path: Digital Talent Tools → R.A.N.D Survey Groups → Assign Practices
After saving Group details, you have two options to select to get to the Assign Practices page:
- In the pop-up window after clicking Continue and Save, select Continue to Assign Practices.
- This opens the page where Practices are selected.
- R.A.N.D. Career Profile requires use of all Practices.
- Click Assign Practices in the Group Grid.
Finalizing Practices #
Click the Confirm Practices button at the bottom of the page to complete the selection.
You will be redirected to the View R.A.N.D. Survey Groups grid, where a confirmation message appears: “Practices assigned to Group”
Important:
- Practices may be added or removed before saving.
- After saving, Practices cannot be changed.
- To modify them, you must create a new Group.
- Groups may be deleted only if they have no Candidates.
Group Grid Updates #
Once Practices are assigned, the View R.A.N.D. Survey Groups Grid will update:
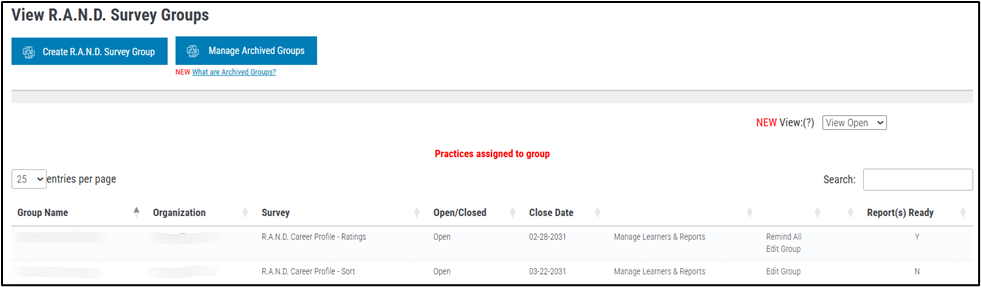
For each R.A.N.D. Survey Group, the grid will display Manage Learners & Reports.
Additional Grid Features #
Each Group’s View R.A.N.D. Survey Groups Grid section will change as steps are completed.
- Edit Group – Before and after assigning Practices, you may edit any information entered in Step 2.
- Save changes by clicking Update Group at the bottom of the screen.
- Groups may be deleted using Delete Group until a Candidate has been added.
Step 4: Manage Learners & Reports #
Menu Path: Digital Talent Tools → R.A.N.D. Survey Groups → Manage Learners & Reports
You can also access this page by clicking Edit Group on the View R.A.N.D. Survey Groups grid and click the Manage Learners & Reports button in the top left corner of the screen.
Survey Credits must be purchased before Candidates can be assigned to a Group. Each Candidate uses one Survey Credit.
Purchases can be made through the Leadership Library on the Purchase → View/Purchase webpage.
The Click To Purchase Surveys button will also take you directly to this page.
Once on the View/Purchase webpage, select the High Potentials button. Then, enter the amount of credits you want in the quantity box for RAND Career Profile.
Manage Learners & Reports for R.A.N.D. Survey Group #
Menu Path: Digital Talent Tools → R.A.N.D. Survey Groups → Manage Learners & Reports
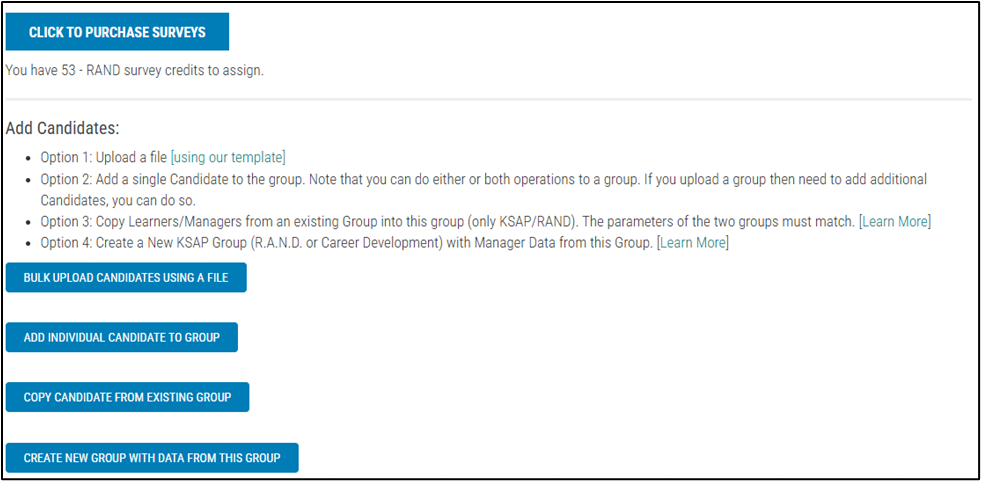
For each Candidate, the following information is required:
- First Name
- Last Name
- Email Address
You may add Candidates using either option below:
- Bulk Upload Candidates Using a File – Complete the .csv template and upload it. (Get the Candidate upload template.)
- Add Individual Candidate to Group – Add a single Candidate manually.
- Copy Candidate from Existing Group – Copy Candidates/Managers from an existing Group into this group (only KSAP/R.A.N.D). The parameters of the two groups must match.
- Create New Group with Data from This Group – Create a New KSAP Group (R.A.N.D. or Career Development) with Manager Data from this Group.
Important: Candidates do not take their own Survey. Their email is entered for identification only, and they do not receive system emails.
Additional Details #
Available actions will vary based on the candidate’s rating status and overall Group status.
The Qualified Administrator controls the timing of all initial Survey invitations.
Before the Close Date, you may:
- Edit or add Candidates and Raters
- Re-send the original email
- Send reminder emails
To generate a report, at least one response must be recorded. When reporting criteria are met, a Report button will appear.
The Raters Complete column shows how many Raters have completed the Survey. It also shows how many have not been invited yet.
After the Close Date has passed, the only available action is report generation, provided all necessary criteria have been met.
Step 5: Edit/Manage Raters #
Edit/Manage Raters for Candidate Survey Group #
Menu Path: Digital Talent Tools → R.A.N.D. Survey Groups → Manage Learners & Reports → Edit/Manage Raters
Once Candidates are added, Raters can be added by the Qualified Administrator.
The Qualified Administrator controls the timing of all initial Rater invitations. The Qualified Administrator may also choose to send initial invitations to the entire Survey Group from the Add/Manage Candidates page.
Adding Raters #
To add Raters:
- Select Manage Learners & Reports in the View Survey Groups Grid.
- Choose Edit/Manage Raters for the Candidate where you want to add Rater(s).
Raters require:
- First Name
- Last Name
- Rater Type – This is set by default to “Manager” for R.A.N.D.
You may add Raters using either option:
- Bulk Upload Raters – Use the .csv upload template.
- Add Individual Rater – Add one Rater manually.
These options are visible in the Candidate’s View Raters Grid.
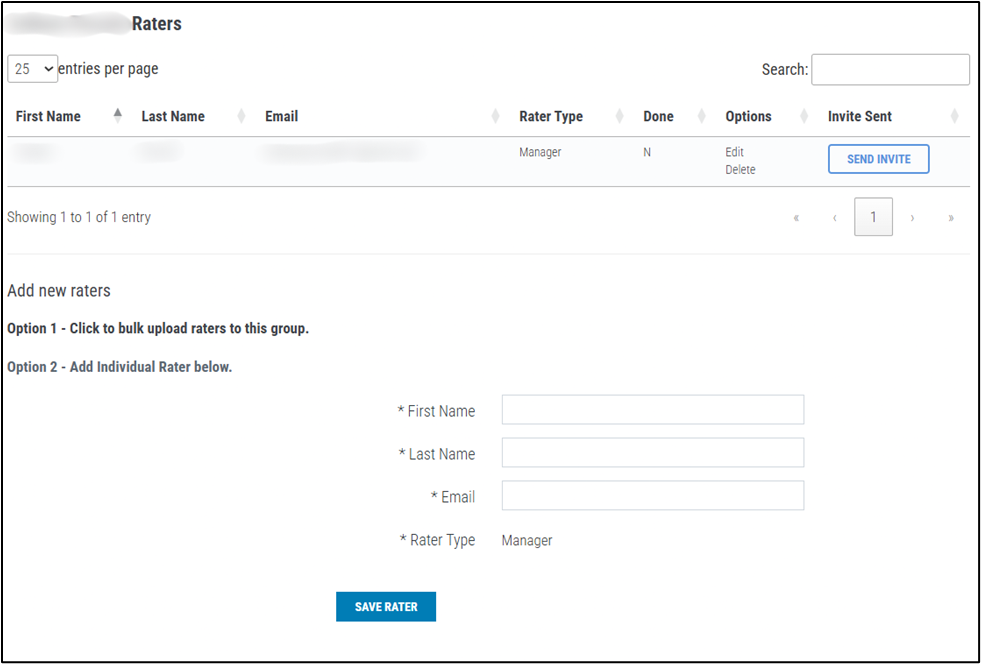
Note: When adding an individual Rater, click Save Rater at the bottom of the page. The Rater will then appear in the Candidate’s Raters Grid.
Step 6: Send Invitation Emails #
Send Invitation Emails for R.A.N.D. Survey Group #
Menu Path: Digital Talent Tools → R.A.N.D. Survey Groups → Manage Learners & Reports
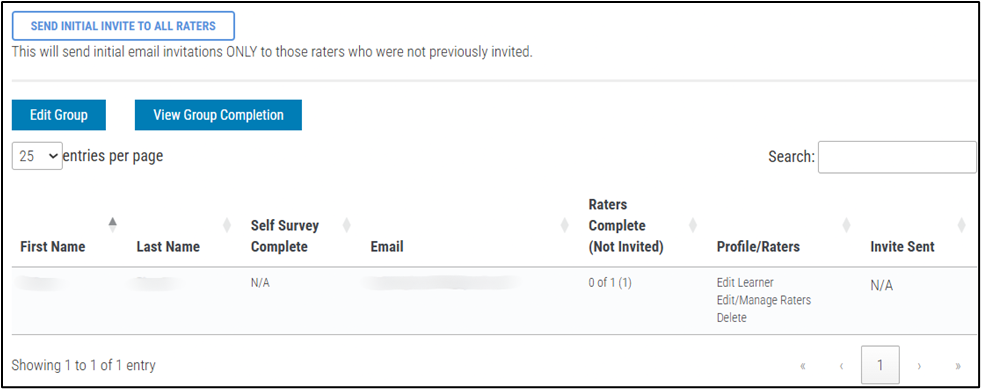
Click Send Initial Invite To All Raters
You may also invite Raters selectively at the individual rater level.
Candidates and Raters may be added to the R.A.N.D. Survey Group at any time.
After invitations have been sent, the page will update to show invitation status.
You may also:
- Send reminder emails
- Re-send the original invitation (These will be sent only to participants who have not completed the Survey.)
- Continue to edit the R.A.N.D. Career Profile Survey settings after inviting the Raters by selecting the Edit Group button. You must select the Update Group button to save any changes.
You can monitor the status of the Group via the Completion Report Grid View. This is accessed by selecting the View Group Completion button shown below:
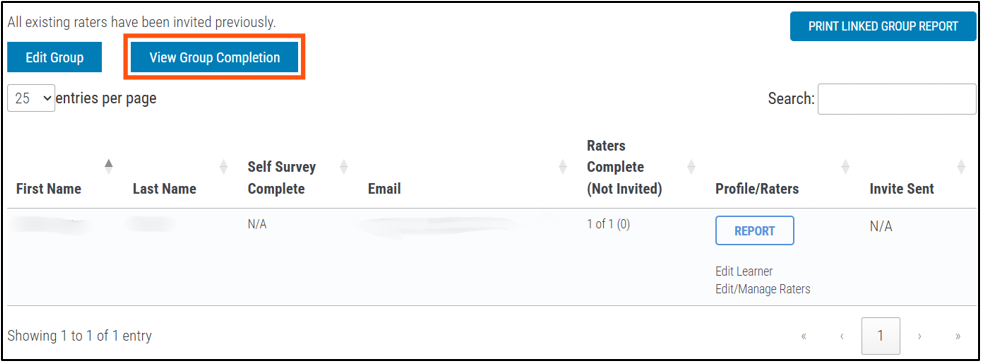
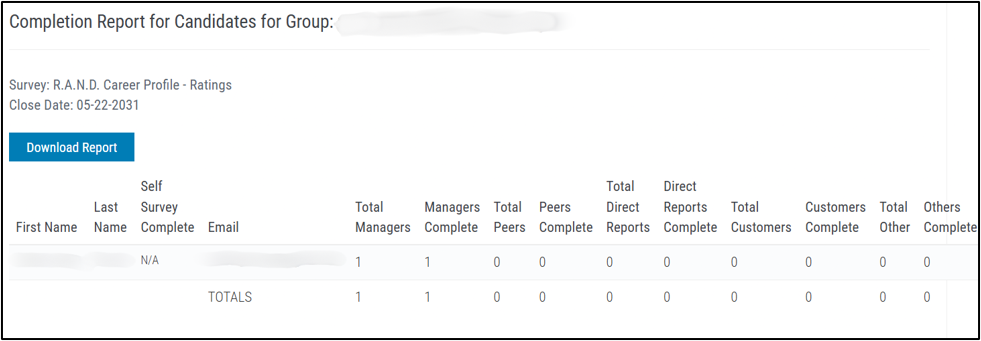
The Completion Report Grid View shows:
- Number invited
- Number completed
Step 7: View and Download Reports #
Menu Path: Digital Talent Tools → R.A.N.D. Survey Groups → Manage Learners & Reports
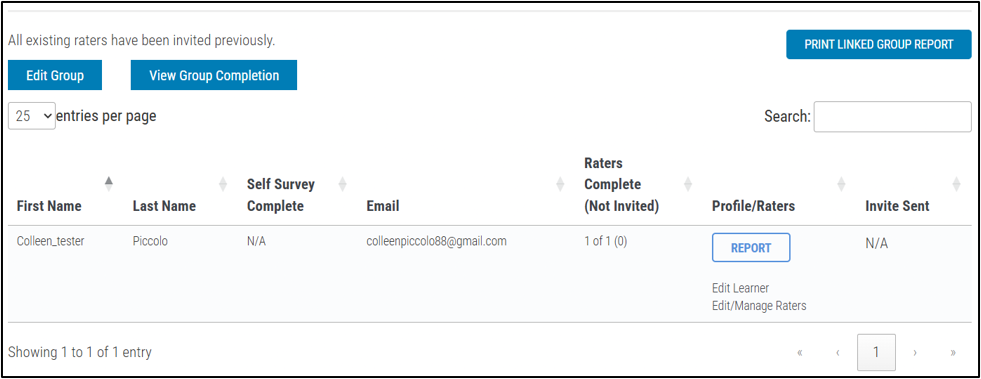
You have several different report options:
- View Group Completion Report – Access this by selecting the View Group Completion button and then selecting the Download Report button. This report downloads the Completion Report Grid View to your computer as a .csv file.
- Individual Candidate Report – You can download an individual candidate report by selecting the Report button next to the Candidate you could like to generate a report on and then selecting the Create Report button on the next page.
- Linked Group Report – The specific criteria needed to generate a Linked Group Report is detailed below.
You may print a Linked Group Report when specific criteria are met:
Sorting Surveys #
Groups can be linked if they share:
- The same Library
- The same number of Sorting Columns
- The same Sorting Type (Relative or Absolute)
Ratings Surveys #
Groups can be linked if:
- They use the same Library
- They use the same set of Practices